Wall-Safe No-Drill Home Accessories for Damage-Free Setup
No-drill home accessories are wall-safe mounting solutions designed to hold lightweight to moderate items without creating drilled holes in the surface. They typically use removable systems such as adhesive strips and hooks to support temporary or semi-permanent placement on indoor walls. In many cases, they reduce direct structural damage compared to drilling, but they operate as lower-risk solutions rather than zero-risk systems.
Wall safety depends on how no-drill home accessories interact with surface condition, load, and mounting method. Adhesive strips may behave differently on painted walls compared to tile or glass, and hooks can transfer pulling stress depending on how weight is distributed. Residue, paint lift, and finish sensitivity may also vary based on wall age, humidity, and installation conditions. For renters, these variations matter because removable systems can still leave marks or require careful removal to avoid surface impact.
In practical use scenarios, wall safety is determined by matching the accessory to the environment and usage behavior rather than assuming universal performance. The same setup may hold well under light, static use but behave differently under repeated pulling or higher load conditions. A simple pre-check helps reduce avoidable issues before mounting.
Key pre-use checks include:
- Verify surface type and finish condition to assess adhesion reliability and paint sensitivity.
- Confirm expected weight and load behavior to prevent stress concentration on a single point.
- Match mounting method such as adhesive strips or hooks to the intended surface and use case.
- Assess everyday use behavior like pulling, repositioning, or swinging items that may increase stress.
- Plan removal approach in advance to reduce risk of residue or paint lift during detachment.
- Stop or adjust if the surface shows weak bonding signs or early lifting during test placement.
This safety framing leads into how wall damage is defined in relation to no-drill home accessories and the conditions under which it may occur.
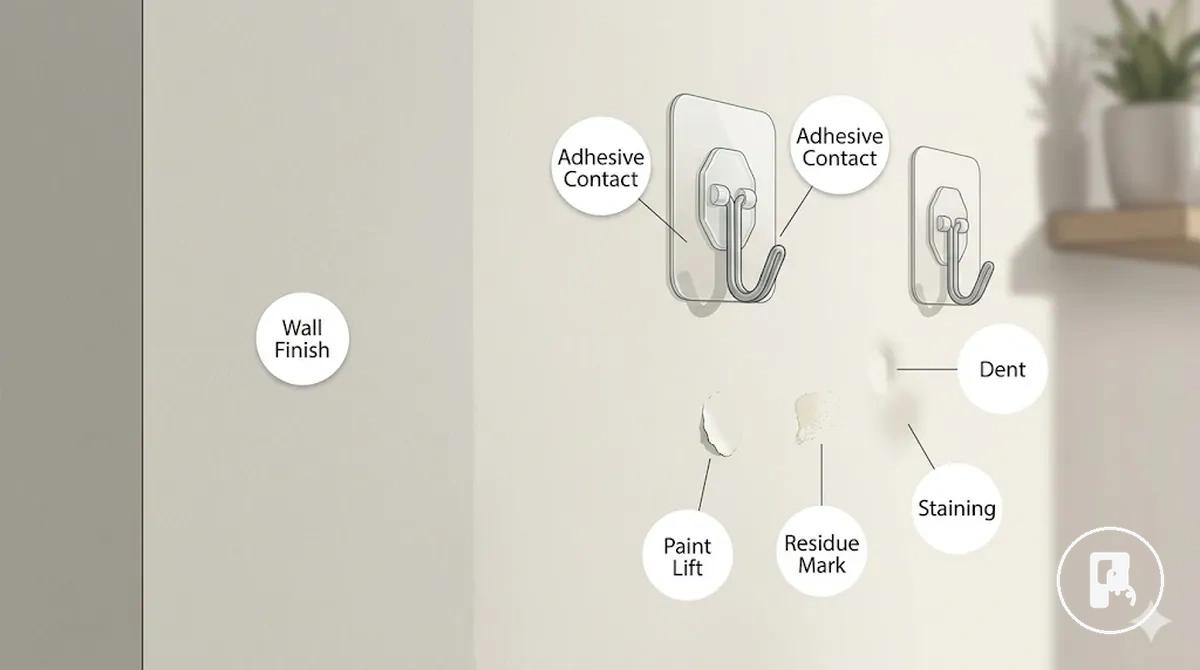
What Wall Damage Means With No-Drill Accessories
Wall damage with no-drill accessories is visible or functional harm to a wall finish, coating, or material caused during adhesive contact, use, or removal of mounting systems. It is a form of wall marks or surface damage that may affect paint, texture, or the wall covering depending on how the surface reacts. This includes both cosmetic changes and deeper finish disruption, and it helps separate true damage from normal, non-structural marks.
Wall damage in the context of no-drill accessories refers to how adhesive contact, surface finish, and load behavior interact during use or removal. The outcome depends on wall finish condition, material type, and environmental factors rather than a fixed result. In many cases, no-drill home accessories reduce drilling-related impact, but can still contribute to paint lift, residue, or surface marks depending on application and removal conditions.
Common forms of wall damage include different types of finish disruption that vary in severity and repair need. These outcomes are linked to how the adhesive or hook interacts with the wall surface.
- Residue left from adhesive contact after removal
- Paint lift where layers detach from the wall finish
- Staining caused by surface interaction or moisture exposure
- Dents created by repeated pressure or load concentration
- Holes formed in weaker or previously damaged wall areas
For renters, wall damage interpretation is often tied to deposit risk rather than appearance alone. Temporary cosmetic marks from removable wall accessories may be treated differently from paint lift or holes that require repair. This distinction is important because rental agreements may classify certain surface damage as chargeable even when no-drill accessories were used temporarily.
Damage-Free Claims and Real Wall-Safety Limits
Damage-free claims describe intended performance of removable adhesive systems under suitable conditions, where no-drill mounting is expected to hold and detach cleanly. These claims define a controlled outcome, not a universal guarantee across all walls, loads, or environments. Their real meaning is defined by wall-safety limits rather than marketing certainty.
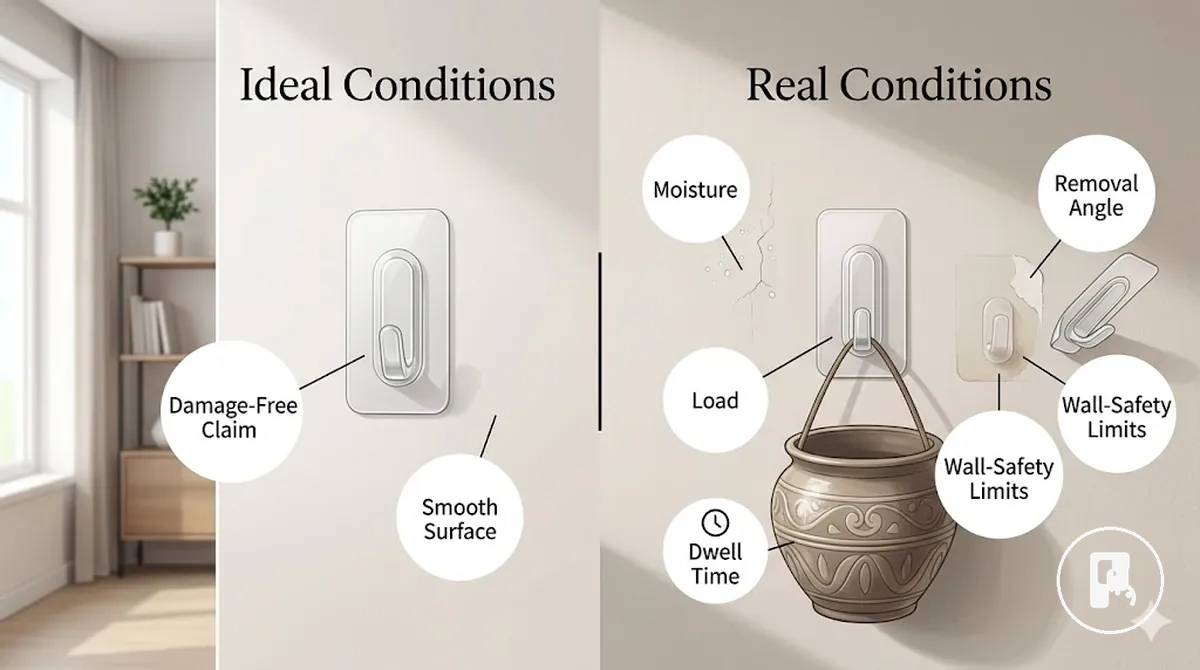
Actual wall-safety performance depends on variables that affect adhesive behavior and surface response. Smooth surfaces and properly painted walls can support more stable bonding, while moisture, heat exposure, and higher load can weaken adhesion. Dwell time, adhesive age, and removal angle also influence whether clean removal occurs or whether residue and paint lift appear.
Many assumptions treat damage-free claims as absolute, but real outcomes shift based on condition and material interaction. The contrast below shows how claims depend on usage context and where limits appear in practice.
| Claim wording | Required condition | Realistic limitation |
|---|---|---|
| Clean removal | Smooth surfaces, correct adhesive application, proper removal angle | May still leave residue or paint lift on weak or aged finishes |
| Strong hold | Low to moderate load, stable wall finish, adequate dwell time | Can fail under higher weight or changing moisture/heat conditions |
| No tools | Suitable painted walls or smooth surfaces | Surface texture may still affect bonding and finish quality |
| Smooth surfaces | Flat, non-porous wall conditions | Textured or porous surfaces reduce reliability |
| Temporary use | Controlled load and limited dwell time | Longer duration increases risk of adhesive marks or paint lift |
For renters, understanding wall-safety limits is important because even a temporary no-drill setup can still create visible marks depending on surface response. These outcomes are often evaluated in rental contexts based on condition rather than intent alone.
Wall Surfaces and Finishes That Change Damage Risk
Wall surfaces and finishes determine how no-drill accessories interact with a wall and how likely wall damage becomes during contact or removal. Damage risk changes depending on wall surfaces and finishes, so compatibility cannot be judged without considering surface condition first. The main variable is the stability of the finish and how it responds to adhesive contact.
Different wall surfaces and finishes carry different attributes that influence adhesive behavior. Painted walls depend on coating strength and curing quality, while wallpaper depends on layer adhesion and can react to lifting forces. Tile and glass usually offer smoother non-porous surfaces, while sealed wood and textured walls introduce variation due to surface irregularity and coating sensitivity. Moisture exposure can further reduce removability and increase risk of adhesive failure or residue.
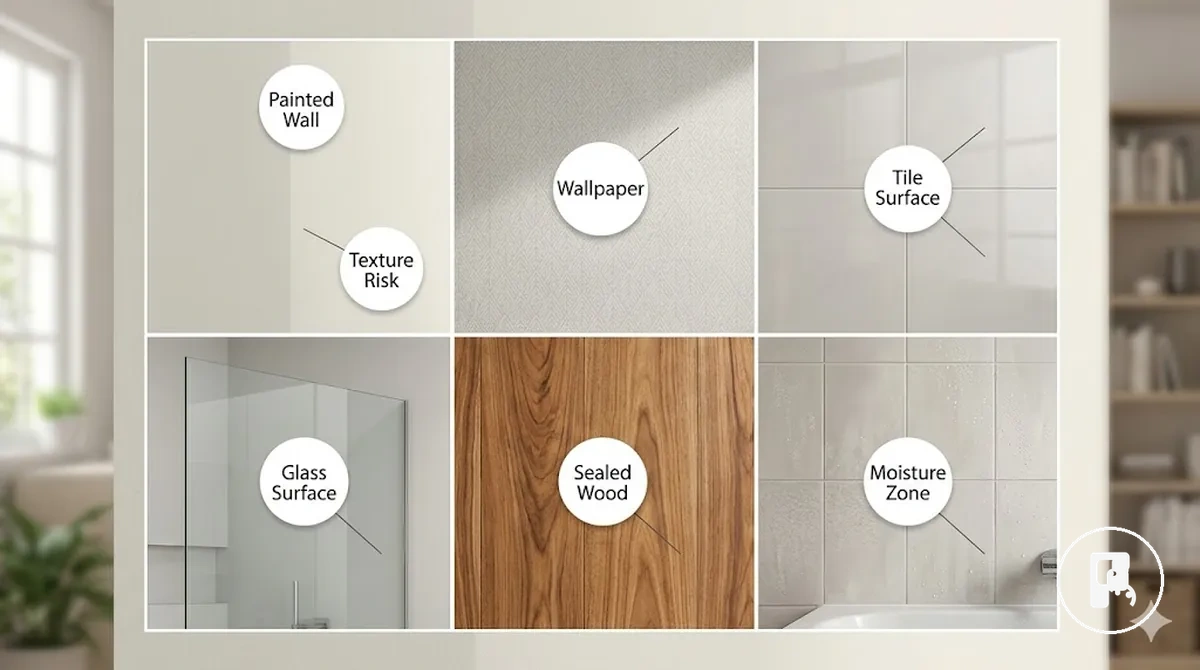
The image above illustrates wall surfaces and finishes that change damage risk, highlighting painted walls, wallpaper, tile, glass, and moisture-prone areas. It shows how different finishes respond to adhesive contact and why surface conditions must be evaluated before mounting.
In practical use, surface type, finish strength, texture, moisture, and removability work together as decision attributes that determine risk level. The table below organizes wall surfaces and finishes using EAV logic to support safer selection decisions.
| Surface or finish | Relevant attribute | Risk condition | Safer decision |
|---|---|---|---|
| Painted walls | Coating strength | Weak or fresh paint may lift under adhesive contact | Allow full curing and use test patch |
| Wallpaper | Layer adhesion | Delamination or tearing under removal force | Use light load and test first |
| Tile | Smooth surface | Generally stable but grout edges can affect grip | Check surface flatness before mounting |
| Glass | Non-porous finish | Slipping under load or moisture exposure | Limit load and verify adhesion |
| Sealed wood | Protective coating | Possible residue or finish dulling | Use removable adhesive with test patch |
| Textured walls | Surface irregularity | Uneven contact reduces adhesion stability | Generally not suitable for mounting |
| Moisture-prone areas | Humidity exposure | Adhesive weakening and detachment risk | Reduce load and test before full use |
Uncertain or freshly painted finishes should always be tested before full mounting because surface response can vary even within the same wall. A small test patch helps evaluate removability and reduces risk from unknown wall conditions.
Painted walls, wallpaper, and weak finishes
Painted walls, wallpaper, and weak finishes can peel, stain, or tear when adhesive contact is too strong or when removal is rushed. Damage risk increases when the wall coating cannot distribute stress evenly across the surface. In many cases, painted walls, wallpaper, and weak finishes fail because coating strength matters more than the wall base itself.
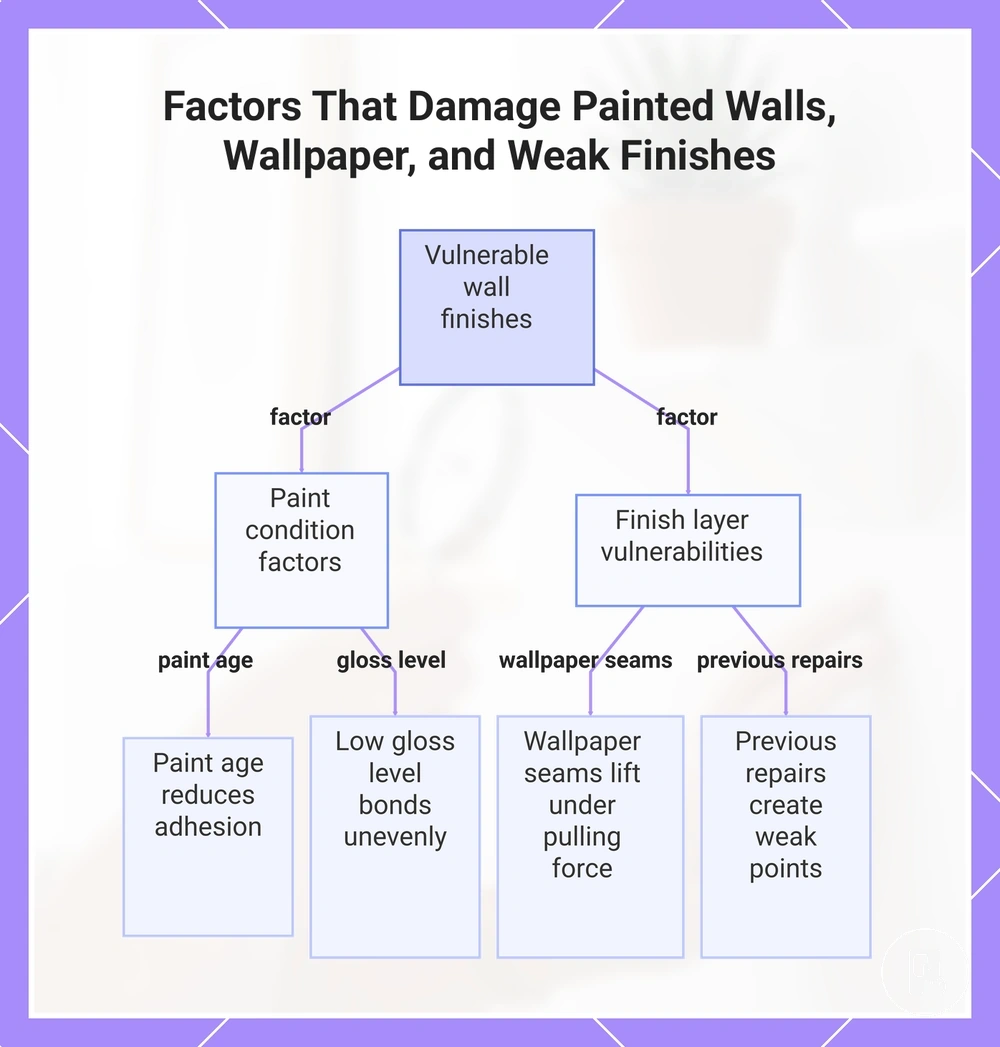
Risk depends on local conditions in the finish layer rather than the wall material alone. Paint age can reduce adhesion over time, while low gloss level coatings may bond unevenly under pressure. Wallpaper seams can lift when exposed to pulling force, and textured coatings may reduce consistent contact, increasing the chance of residue or tearing. Previous repairs can also create weak points that react differently under adhesive stress.
Caution factors in vulnerable finishes:
- Paint age: older paint layers may lose adhesion and peel under stress
- Gloss level: uneven or low gloss finishes can reduce bonding stability
- Adhesion quality: weak bonding between layers increases lift risk
- Wallpaper seams: joints may separate when exposed to pulling force
- Previous repairs: patched areas can react unpredictably under load
A freshly repainted rental wall with uneven old layers underneath may show peeling around adhesive contact points even when the surface looks stable. This effect usually stays localized and depends on how strong the underlying wall coating remains.
This chart shows the main factors that increase damage risk when adhesive contact is too strong or removal is rushed on vulnerable wall finishes.
Smooth tile, glass, sealed wood, and moisture-prone surfaces
Smooth tile, glass, sealed wood, and moisture-prone surfaces change damage risk by shifting it from paint-lift concerns to surface interaction issues. These non-porous surfaces often reduce peeling risk on painted layers, but they introduce new conditions related to suction stability, slipping, adhesive residue, and finish dulling. The main risk class becomes performance variation under contact and moisture rather than coating failure.
These smooth sealed surfaces behave differently based on their local variables. Smooth tile with a strong glaze may support cleaner removal but can still leave adhesive residue depending on surface cleaning. Glass relies more on suction and can slip under load when moisture or condensation is present. Sealed wood may resist peeling but can show finish dulling or spot-based residue after removal. Moisture-prone areas increase variability because condensation and cleaning residue reduce stability across all surface types.
| Surface condition | Main wall-safety implication |
|---|---|
| Smooth tile | Lower paint-lift risk, but possible adhesive residue on glazed surfaces |
| Glass | Suction-based hold with slipping risk under moisture or load |
| Sealed wood | Reduced peeling risk but possible finish dulling and residue after removal |
| Moisture-prone areas | Condensation and cleaning residue reduce stability across all surfaces |
Across these surfaces, moisture becomes the key condition that shifts performance, especially when suction strength and surface cleanliness vary over time.
Lower-Risk Mounting Options for No-Drill Accessories
Lower-risk mounting options for no-drill accessories depend on how the mounting method matches surface type, load level, residue sensitivity, and removal planning. The selection is not based on maximum holding strength alone but on fit between contact method, wall condition, and clean removal needs, where fit over strength becomes the primary decision rule.
Lower-risk mounting options typically fall into functional groups based on contact method. Removable adhesive strips, hooks, pads, wall-safe tape, and putty rely on adhesive contact with different load distribution patterns and varying residue potential. Hook-and-loop systems use reusable interlocking surfaces, suction depends on air-seal contact on smooth surfaces, while clip-on and tension options reduce or avoid adhesive use by relying on mechanical grip or pressure. Each group differs in how it responds to surface texture and removal behavior.
The comparison below outlines how lower-risk mounting options behave across contact method, surface dependence, residue tendency, and likely failure mode. It helps distinguish selection logic across removable options rather than ranking individual products or creating a catalog-style list.
| Mounting option | Contact method | Lower-risk condition | Main trade-off |
|---|---|---|---|
| Removable adhesive strips | Pressure-sensitive adhesive with pull-tab removal | Painted walls with light to moderate load | Possible adhesive residue on weak finishes |
| Hooks | Adhesive-backed hook base | Smooth painted surfaces with proper curing | Limited load capacity compared to fixed mounts |
| Pads | Distributed adhesive surface contact | Flat surfaces with balanced load spread | Uneven residue patterns depending on texture |
| Wall-safe tape | Continuous adhesive strip contact | Temporary light objects on smooth surfaces | Higher residue risk on textured finishes |
| Putty | Malleable adhesive mass contact | Very light objects on stable painted walls | May leave marks on delicate coatings |
| Hook-and-loop | Interlocking reusable surface contact | Repositionable light-duty mounting needs | Reduced stability under uneven load |
| Suction | Air-pressure seal on smooth surfaces | Glass or smooth tile with clean surface | Slipping risk under moisture or dust |
| Clip-on | Mechanical edge grip | Existing structural edges or frames | Requires compatible geometry |
| Tension | Pressure-based structural contact | Between stable surfaces with adjustable fit | Possible pressure marks without adhesive residue |
Selection of lower-risk mounting options becomes clearer when clean removal matters more than maximum holding strength, especially in temporary setups where residue control and surface protection are the priority.
Removable adhesive strips, hooks, and pads
Removable adhesive strips, hooks, and pads are selection-dependent mounting options for small to moderate accessories where clean removal is the main requirement. These removable adhesive strips, hooks, and pads depend on surface preparation, load behavior, and correct release handling, where tab access and controlled pull direction influence removal outcome on painted walls.
These systems vary by how they manage adhesion and release behavior. Removable adhesive strips rely on controlled tab access for straight pull direction removal, while hooks distribute load through a fixed adhesive base. Pads increase contact area to spread load, but this can change residue behavior depending on surface texture and cure time. In all cases, rated load and surface condition must align with manufacturer limits.
- Tab access: enables controlled release and reduces uneven pulling stress
- Rated load: defines expected load range but varies with surface condition
- Painted walls: performance depends on coating strength and surface preparation
- Cure time: affects bond stability before full load is applied
- Contact area: larger area spreads force but may alter removal behavior
- Pull direction: straight removal reduces risk of surface stress or residue
Lightweight items typically work within removable adhesive strips or pads, while hooks may support slightly higher loads depending on installation quality. However, performance is always conditional and depends on correct application, surface condition, and adherence to manufacturer limits rather than fixed behavior.
Putty, tape, hook-and-loop, and tension options
Putty, tape, hook-and-loop, and tension options are secondary temporary wall use methods where each option changes the balance between hold, residue, visibility, and surface stress. These putty, tape, hook-and-loop, and tension options are typically chosen when temporary wall use depends more on controlled removal behavior than on maximum holding strength, with trade-offs varying by surface condition and dwell time.
Putty, wall-safe tape, hook-and-loop, and tension options differ in how they manage contact and removal. Putty can support lightweight decor but may increase residue on textured surfaces. Wall-safe tape can improve short-term placement on flat painted walls but may increase paint sensitivity over time. Hook-and-loop systems depend on repeated surface pairing, which can affect visibility and flexibility. Tension options avoid adhesive use but may introduce surface stress or pressure marks depending on installation.
| Option | Better for | Watch for |
|---|---|---|
| Putty | Lightweight decor on smooth or lightly textured surfaces | Residue buildup and texture sensitivity |
| Wall-safe tape | Temporary mounting on flat painted walls | Time-related adhesion changes and paint risk |
| Hook-and-loop | Repositionable items needing repeated access | Visible strips and uneven load distribution |
| Tension options | No-adhesive temporary setups between stable surfaces | Surface stress and possible pressure marks |
These secondary options are typically evaluated by residue, visibility, and surface stress under temporary wall use conditions, where performance depends strongly on surface type and duration of application.
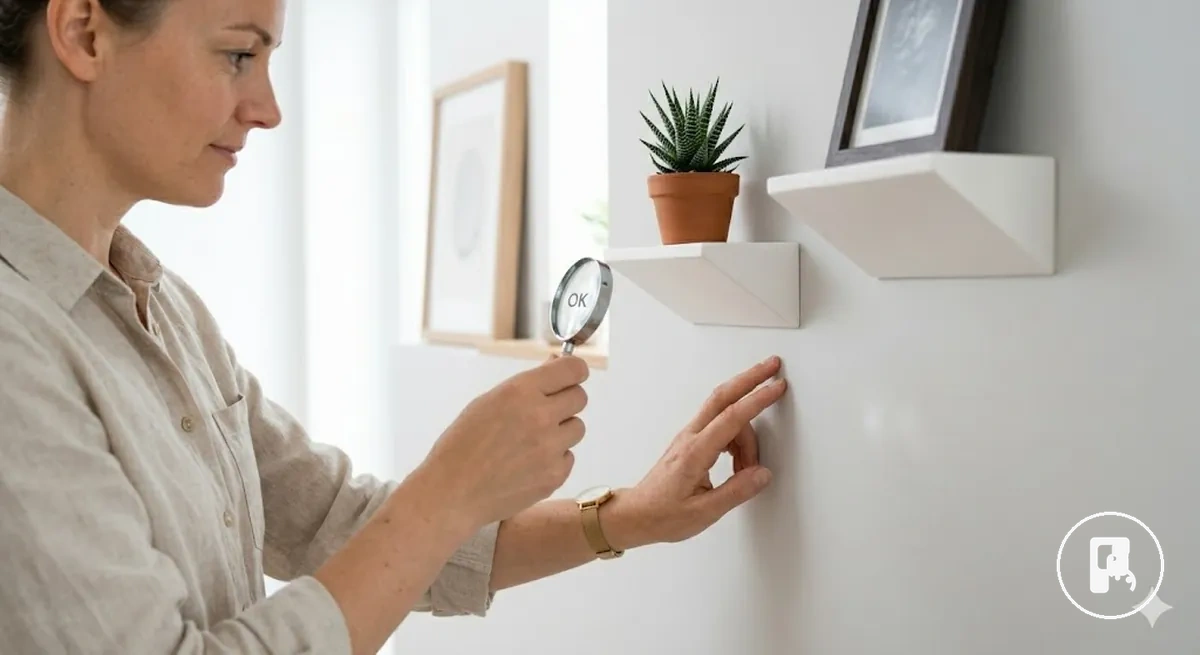
Pre-Mounting Checks That Protect Paint and Finish
Pre-mounting checks protect paint and finish by validating surface condition, weight, and contact area before applying any no-drill mounting system. These pre-mounting checks reduce risks like peeling, residue, and surface stress by aligning wall limits with object load and preparation quality.
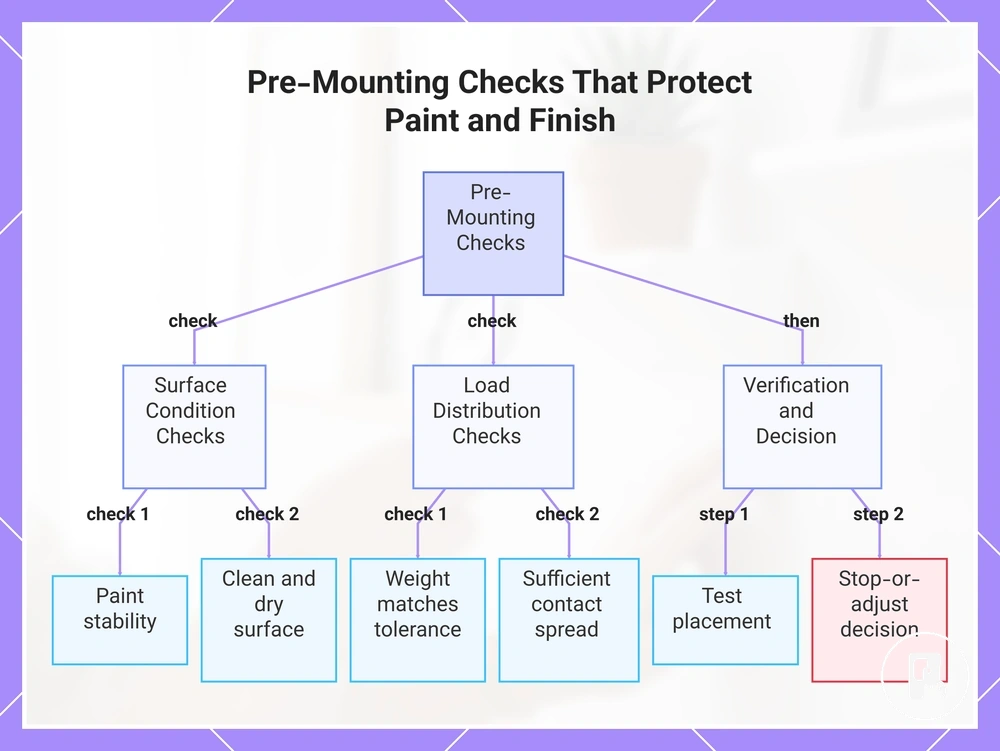
Wall condition checks start with paint and finish stability. Painted walls may behave differently depending on coating strength and age. Cleaning and dryness directly affect adhesion reliability. Test placement helps confirm how the surface reacts before full application, especially when finish sensitivity is uncertain.
Weight and contact area checks ensure load is not concentrated on weak points. Higher weight on small contact areas increases surface stress on painted walls. If load and surface condition do not align, a stop-or-adjust decision is needed, which may require a lighter accessory or a different mounting approach.
These pre-mounting checks can be summarized into practical verification steps that connect surface, preparation, and load behavior before mounting decisions are made.
- Surface condition: verify paint stability and shift to test placement if finish is uncertain
- Cleaning: ensure dust-free and dry surface to support adhesion bond formation
- Weight: match load to wall tolerance and choose a lighter accessory if needed
- Contact area: confirm enough spread to reduce localized surface stress
- Test placement: apply a small area check before full mounting decision
- Dryness: confirm no moisture that can weaken adhesion performance
- Stop-or-adjust: change method if paint or finish shows early stress signs
These checks align with damage-safe installation by ensuring surface and load conditions are evaluated before full mounting begins.
This chart shows the key pre-mounting checks to protect paint and finish, including surface condition, load distribution, and verification steps before full mounting.
Weight limits, contact area, and placement
Weight limits, contact area, and placement determine how no-drill accessories distribute load across paint and finish, and whether stress remains spread or becomes concentrated at a single point. These weight limits, contact area, and placement variables interact with leverage, where small changes in positioning can shift force from balanced support to localized stress concentration on the wall surface.
Item weight and rated load define the baseline condition, while manufacturer instructions set the boundary for expected performance. Vertical pull usually keeps force more aligned with the surface, while sideways pull increases leverage and raises stress on paint edges. Dynamic load from movement or repeated pulling can further increase variation compared to static placement conditions.
Contact area controls how force spreads across the surface. Larger contact area reduces stress concentration, while smaller contact zones increase pressure on specific paint points. Corner placement can amplify leverage effects due to angle geometry, and heat exposure may weaken adhesion stability depending on material sensitivity and environmental conditions.
| Variable | Condition | Wall-risk effect |
|---|---|---|
| Item weight | Near rated load limits | Increases stress concentration on paint and finish |
| Contact area | Small adhesion footprint | Raises localized pressure and peeling risk |
| Placement | Corner or edge positioning | Increases leverage and uneven force distribution |
| Vertical pull | Aligned downward force | More stable load distribution across surface |
| Sideways pull | Lateral or angled force | Increases edge stress and paint separation risk |
| Dynamic load | Movement or repeated force | Increases adhesive fatigue and instability |
| Heat exposure | Warm or humid conditions | May reduce adhesive stability over time |
These variables should be interpreted through manufacturer instructions, since real performance depends on how weight, placement, and contact area combine under actual wall conditions.
Surface cleaning, dryness, and small-area testing
Surface cleaning, dryness, and small-area testing reduce avoidable adhesive failure by controlling how dust, oil, and moisture interact with paint before contact. These checks are preconditions rather than a full installation process, since surface cleaning, dryness, and small-area testing alone cannot make every wall safe for adhesive use. The main value is identifying early paint lift risk and unstable bonding behavior before full placement.
These safety checks remain conditional because wall performance can still vary after preparation. Dust, oil, moisture, and cleaner residue may still affect adhesion even on a visibly clean surface. A hidden test spot helps reveal localized paint lift, while waiting time supports proper drying before evaluation. If the test area shows lift or surface disturbance, adhesive use should be avoided on that section.
- Dust removal: check and remove loose dust to reduce early adhesion interference, then observe whether surface texture still traps particles.
- Oil check: identify and lightly clean surface oil or fingerprints, then confirm whether bonding remains stable.
- Moisture control: ensure dryness before placement since moisture can weaken adhesion and increase slip risk.
- Hidden test spot: apply a small-area test in a less visible zone to detect paint lift or surface reaction.
- Waiting time: allow sufficient drying time after cleaning to reduce cleaner residue interference before final testing.
Use Habits That Prevent Pulling and Peeling
Use habits after installation determine how much ongoing wall stress builds up around no-drill accessories during daily interaction. Damage prevention continues after mounting, not only during installation, because everyday handling can gradually influence pulling and peeling around hooks and organizers. This makes use behavior part of wall safety alongside the mounting setup.
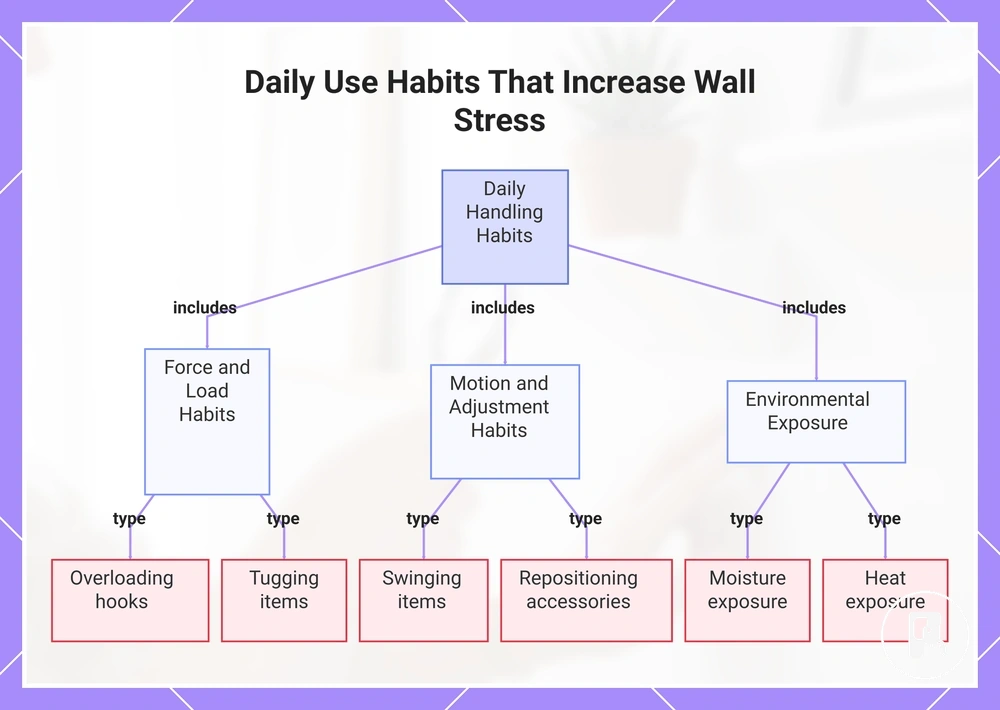
Recurring use habits such as overloading hooks, tugging items during removal, swinging items repeatedly, or exposing surfaces to moisture exposure can increase wall stress over time. Repositioning accessories too often and exposing them to heat can also affect adhesive stability depending on surface conditions. These handling patterns influence how stress spreads across paint and finish, affecting long-term wall behavior.
In practice, hooks holding daily items, small organizers used for frequent access, and temporary decor that is often adjusted show how everyday use changes wall stress. Gentle handling and reducing unnecessary movement can help limit pulling and peeling without changing the mounting system itself.
- Overloading: increases load on hooks and organizers, raising stress on paint contact points
- Tugging: creates sudden force that can increase peeling around adhesive edges
- Swinging items: adds repeated motion that spreads uneven wall stress
- Moisture exposure: can weaken adhesive behavior over time depending on surface condition
- Repositioning: frequent adjustment can reduce long-term adhesion stability
- Heat exposure: may affect adhesive performance in warmer or humid environments
This chart shows the main categories of daily use habits that increase wall stress around no-drill accessories, leading to pulling and peeling.
Clean Removal Without Residue or Paint Lift
Clean removal without residue or paint lift refers to the controlled separation of no-drill accessories from a wall surface in a way that limits adhesive residue and reduces the risk of paint lift. This outcome depends on how release forces are managed during detachment, and it functions as the final wall-protection stage after use. :contentReference[oaicite:0]{index=0}
Clean removal depends on release direction and patience during detachment. Tab pulling should stay aligned with the wall surface to reduce stress on paint layers. Slow separation helps distribute force more evenly and lowers the chance of sudden paint lift.
- Tab pulling: pull tabs slowly in a straight direction under steady resistance; stop point applies if paint tension increases.
- Release direction: keep motion parallel to the wall surface under controlled force; stop point applies if edges begin to lift.
- Slow separation: peel gradually in small increments under low force; stop point applies if paint lift appears.
- Surface testing: test a small corner area before full removal under light pressure; stop point applies if residue spreads or finish weakens.
- Controlled pace: maintain steady movement without rushing under stable grip; stop point applies if surface stress becomes visible.
Gentle heat can support adhesive softening when removal becomes resistant. Low, controlled warmth helps reduce bonding strength through adhesive softening and enables slower separation without forcing detachment. Overheating should be avoided since it may increase surface sensitivity and affect paint stability during separation.
Residue handling depends on paint sensitivity and adhesive behavior on the specific surface. A plastic tool can help lift remaining adhesive carefully without scratching, while any sign of paint lift should be treated as a stop point to avoid further surface damage.
For structured guidance on detachment flow and safety boundaries, follow the clean removal steps to ensure controlled and surface-safe detachment.
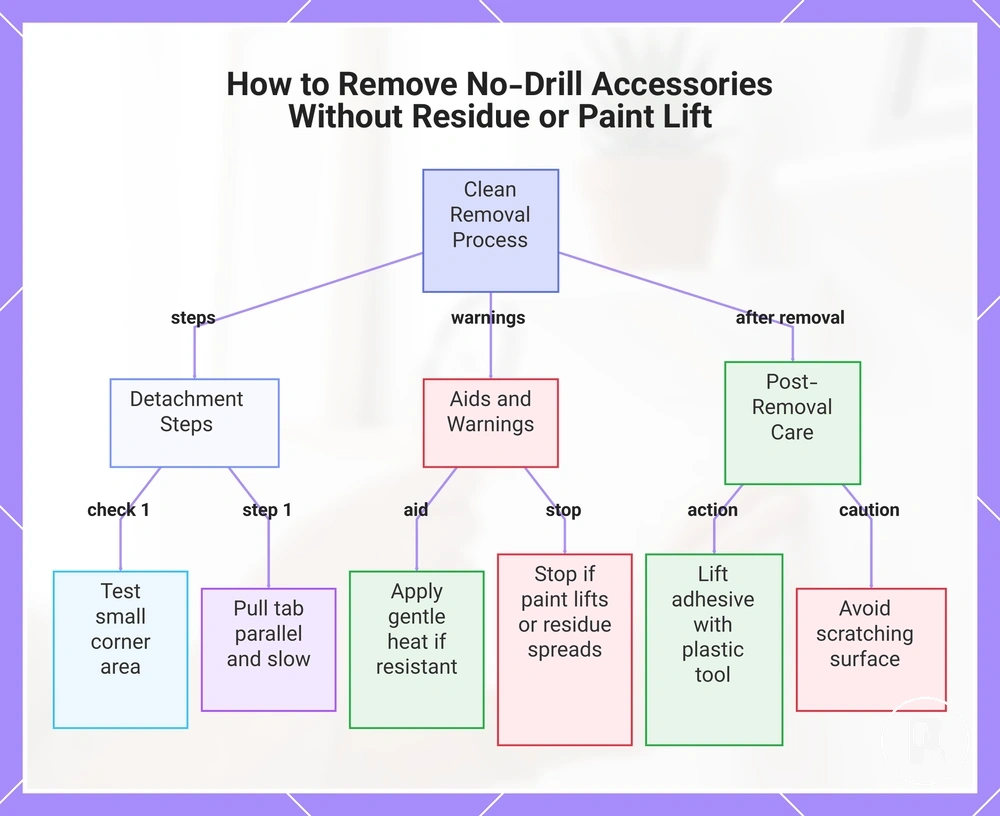
This chart outlines the controlled detachment steps, key warnings, and post-removal care for clean accessory removal from walls.
Gentle heat, slow separation, and no prying
Gentle heat, slow separation, and no prying refers to a controlled removal approach for adhesive-mounted no-drill accessories where the goal is to reduce paint lift risk during physical detachment. This method depends on gradual release conditions because forceful pulling or prying increases stress on paint layers and can trigger surface damage during separation.
Gentle heat may support adhesive softening when applied at a low setting, allowing the bond to loosen before movement begins. Slow separation should be maintained with steady tension so the adhesive releases progressively instead of breaking suddenly. No prying is required because angled lifting concentrates force at one point, which can increase the likelihood of paint lift or surface tearing.
- Low heat: apply gentle heat at a low setting under controlled distance; stop point applies if paint begins to react or soften visibly.
- Controlled angle: keep separation angle shallow to maintain even load distribution; stop point applies if edges start lifting.
- Slow tension: pull gradually with consistent force to support gradual release; stop point applies if resistance increases suddenly.
- Tab access: use available pull tabs in aligned direction to guide release; stop point applies if adhesive does not separate evenly.
Plastic tools can assist in guiding separation when needed, but only under controlled pressure to avoid marking the surface. Any visible paint disturbance or unexpected resistance should be treated as a stop point before continuing the removal process.
Residue cleanup and surface testing
Residue cleanup and surface testing refers to handling adhesive residue after removal by matching the cleaning method to the surface finish and adhesive type. The approach depends on how the paint or coating responds to leftover adhesive, since different finishes react differently to cleaning pressure and moisture. In most cases, surface testing is required before any residue cleanup begins to reduce the risk of paint damage. :contentReference[oaicite:0]{index=0}
Residue cleanup works best when controlled by local surface conditions rather than a fixed method. Mild cleaning with a soft cloth is typically used to reduce surface stress during contact. Spot testing helps identify whether the finish reacts safely to light cleaning. Dwell time may be needed to let residue loosen before wiping. Remover compatibility varies by surface, so finish observation after each step is important. Gradual cleanup is preferred to avoid disturbing weak paint layers.
Residue cleanup must match the surface finish and the adhesive type left on the wall. This step helps prevent finish damage by ensuring the cleaning approach is adjusted before any wiping begins.
- Do: perform spot testing before full residue cleanup
- Do: use mild cleaning with a soft cloth for controlled removal
- Do: allow dwell time when adhesive residue does not release immediately
- Do: inspect finish after each cleaning step for changes
- Avoid: aggressive rubbing that may disturb paint or surface coating
- Avoid: assuming all cleaners are compatible with all surface finishes
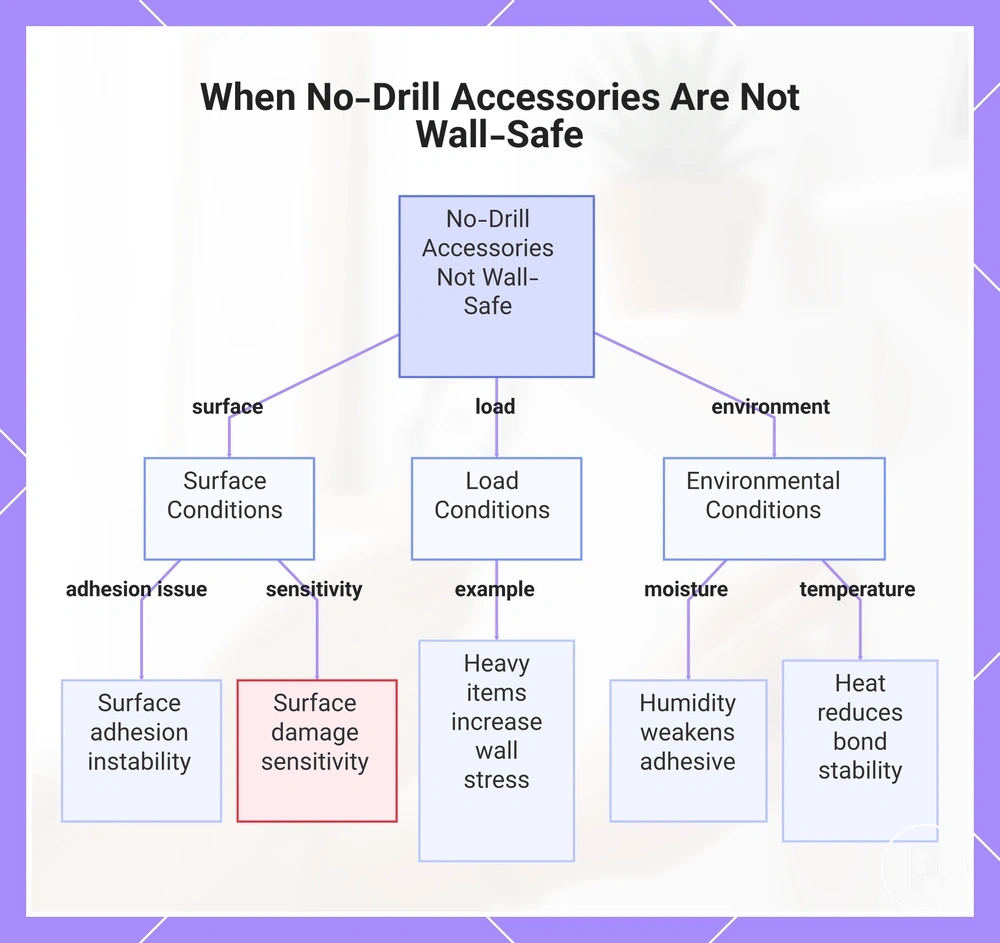
When No-Drill Accessories Are Not Wall-Safe
No-drill accessories are not wall-safe when surface, load, and environment conditions combine in a way that increases adhesive stress beyond stable limits. Wall safety depends on the combined condition of weak paint, loose wallpaper, crumbling plaster, heavy items, humidity, heat exposure, valuable finishes, and renter-sensitive surfaces, where higher risk appears when multiple factors overlap.
Wall safety becomes higher risk when the surface itself cannot hold stable adhesion or changes under environmental pressure. Weak paint can separate under adhesive contact, while loose wallpaper reduces bonding stability. Crumbling plaster creates structural instability that limits safe attachment. Humidity and heat exposure can also weaken adhesive performance and increase variability in holding strength over time.
- Weak paint: Adhesive contact can trigger paint lift, so avoid mounting or reduce load when coating is unstable.
- Loose wallpaper: Bond failure risk increases, making surface unsuitable for adhesive-based accessories.
- Crumbling plaster: Structural instability creates stop conditions where adhesion cannot hold safely.
- Heavy items: High load increases wall stress, so non-wall support or mechanical fixtures may be safer.
- Humidity: Moist environments can weaken adhesive performance and increase long-term higher risk.
- Heat exposure: Temperature changes may reduce bond stability and increase separation risk over time.
- Valuable finishes: High-sensitivity surfaces may suffer visible damage, requiring careful avoidance or testing.
- Renters: Deposit-sensitive environments require caution where residue or paint change may be critical.
When load, surface, and environment conditions overlap, no-drill mounting should be treated as higher risk and adjusted or avoided based on stability rather than convenience. In such cases, using a non-wall support or selecting a lighter item may reduce risk compared to forcing adhesive installation. The final safety decision should prioritize surface integrity and long-term wall condition.
This chart shows the surface, load, and environmental conditions that increase adhesive stress and make no-drill accessories unsafe for walls.
The products below are useful examples for comparing available options. Before buying, check that the compatibility criteria, key features, and product details match your needs.