Removing No-Drill Home Accessories Cleanly
Removing no-drill home accessories cleanly depends on the mounting type, surface finish, and adhesive condition. The safest approach changes based on how the accessory was installed and how strongly it is bonded to the surface. Controlled handling reduces the risk of surface damage and uneven removal results. A clear understanding of the system behind each mount is essential before any force is applied.
The process varies because different mounting types behave differently under pressure. Adhesive-backed options may respond to gradual peeling, while suction mount systems rely on seal release rather than pulling force. Painted wall surfaces can react differently depending on coating strength, and older adhesive layers may behave less predictably than newer ones. These differences mean that removal method decisions should always be based on the specific setup rather than a single approach.
In many cases, clean removal involves controlled release rather than direct pulling. Adhesive residue may remain when bonds separate, especially if pressure is uneven during detachment. Suction mount systems typically release through seal disruption, while other removable wall accessories may need slower separation to avoid stress on the surface. Keeping movement steady and aligned with the mounting direction helps reduce unnecessary surface strain.
Before starting removal, it is important to observe how the accessory is fixed and how the surface responds to light pressure. Signs of stiffness, uneven tension, or resistance can indicate that a slower method is needed. Understanding these early conditions helps guide the safest removal method and prepares the surface for a cleaner separation process.
Check the Mounting Method and Surface Before Removal
Mounting method and surface type decide the safest removal path for no-drill home accessories. The removal risk changes based on how the item is fixed and how the surface reacts to separation force. Adhesive age, release features, and wall finish all influence whether a slow peel, controlled release, or stop signal is needed.

Before applying force, the mounting method and surface condition should be checked in a simple decision order. This helps avoid unnecessary surface damage and reduces incorrect removal actions.
- Mounting method: adhesive strip or hook → look for release tab → use slow pull instead of force
- Mount style: suction mount → check seal pressure → release by breaking seal gently
- Surface type: painted wall → watch for coating lifting → stop if paint starts to separate
- Surface type: tile or glass → check bond edge → prefer controlled slide release
- Surface type: wood → check grain sensitivity → reduce pulling angle if resistance increases
- Adhesive age: older bond → expect higher residue risk → proceed with slower separation
Renter setups often use a renter-friendly no-drill setup where temporary accessories are chosen for cleaner removal, but surface condition still determines the final removal risk. Installation history also affects outcome because how the system was installed without surface damage influences bond strength during release. For related setup behavior, see install without surface damage as installation quality directly impacts later removal behavior.
Adhesive hooks, strips, pads, and mounting tape
Adhesive hooks, adhesive strips, pads, and mounting tape are adhesive-backed accessories that differ by release feature and adhesive layer structure, which directly affects how they separate during removal from a wall surface.
These formats vary based on elements like release tab presence, foam layer thickness, stretch behavior, or tape bonding type. These differences influence whether removal leads to controlled detachment, surface residue, or material deformation during separation.
The close-up example below shows how adhesive hooks, strips, pads, and mounting tape connect to a surface and where separation typically begins for each format.
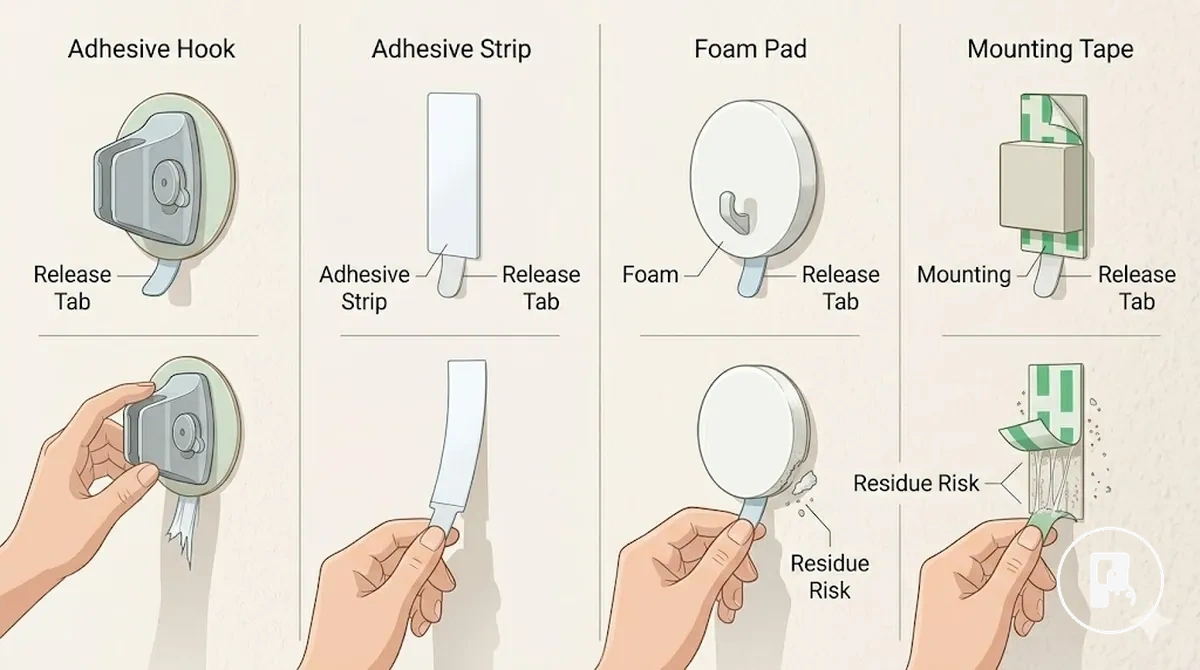
- Adhesive hooks → visible hook base with release tab → controlled pull possible but may leave residue after removal
- Adhesive strips → flat bonded strip → may stretch during removal and require slow separation to reduce residue risk
- Adhesive pads → foam layer backing → compressive bond that can tear unevenly and leave residue on the surface
- Mounting tape → double-sided tape layer → strong adhesion that often requires careful edge lifting before detachment
Suction, tension, and clip-on mounts
Suction, tension, and clip-on mounts are non-adhesive mounting systems that rely on pressure, seal force, or mechanical grip instead of adhesive, so their removal depends on controlled release points rather than pulling actions used for glue-based systems.
The comparison below shows how suction, tension, and clip-on mounts differ in their release behavior, including how each system disengages from its seal, pressure contact, or latch mechanism.
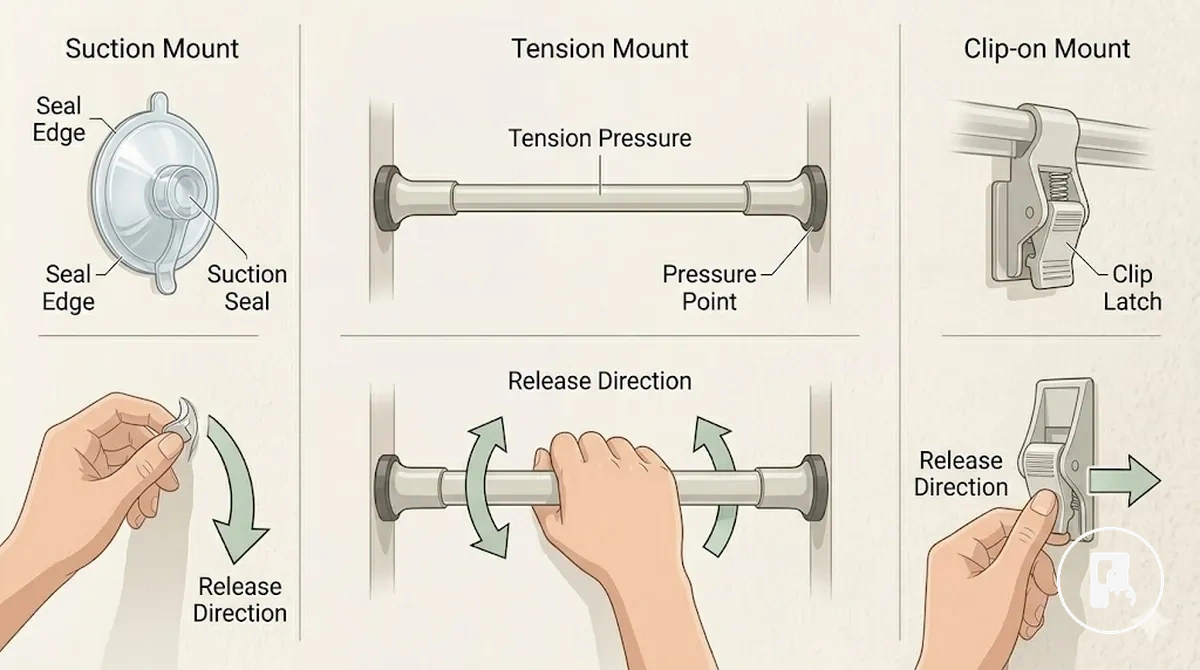
- Suction mount → uses air seal pressure → release point breaks vacuum seal → may leave temporary pressure imprint on smooth surfaces
- Tension mount → uses opposing pressure force → release point loosens when tension is reduced → may cause light surface pressure marks
- Clip-on mount → uses mechanical latch system → release point disengages latch or clip → may require careful release to avoid surface stress
Painted walls, drywall, tile, glass, and wood surfaces
Painted wall, drywall, tile, glass, and wood surfaces depend on surface finish and coating condition when determining acceptable removal force. The same accessory can behave differently because surface finish, coating strength, solvent sensitivity, and scraping risk change how much pressure a surface can tolerate during removal.
The table below compares how each surface responds to removal actions such as pressure, heat exposure, solvent sensitivity, and scraping risk. This helps identify when a gentler removal approach is required based on material condition rather than surface type alone.
| Surface | Sensitive attribute | Removal risk | Safer approach |
|---|---|---|---|
| Painted wall | Paint film and coating condition | Lifting or coating damage under pressure | Low-force removal with minimal scraping risk |
| Drywall | Paper layer and core density | Surface tearing or moisture sensitivity | Gentle release with controlled pressure |
| Tile | Glazed surface finish | Edge stress or residue under scraping | Careful lift with reduced scraping risk |
| Glass | Smooth sealed surface finish | Pressure marks or friction sensitivity | Controlled pressure release with soft contact |
| Wood (sealed or unsealed) | Surface finish and solvent sensitivity | Discoloration or finish impact from scraping or solvents | Low-force removal avoiding scraping risk |
:contentReference[oaicite:0]{index=0}
Remove Adhesive Hooks, Strips, Pads, and Mounting Tape Cleanly
Adhesive hook, adhesive strip, pad, and mounting tape removal depends on controlled release along the release direction, not force, since bond strength determines how the adhesive separates from the surface.
Removal behavior changes with bond strength, adhesive age, and installation condition. Broken release tabs, old adhesive, and thick mounting tape often increase resistance and may leave residue or affect the surface coating if the separation is rushed or uneven.
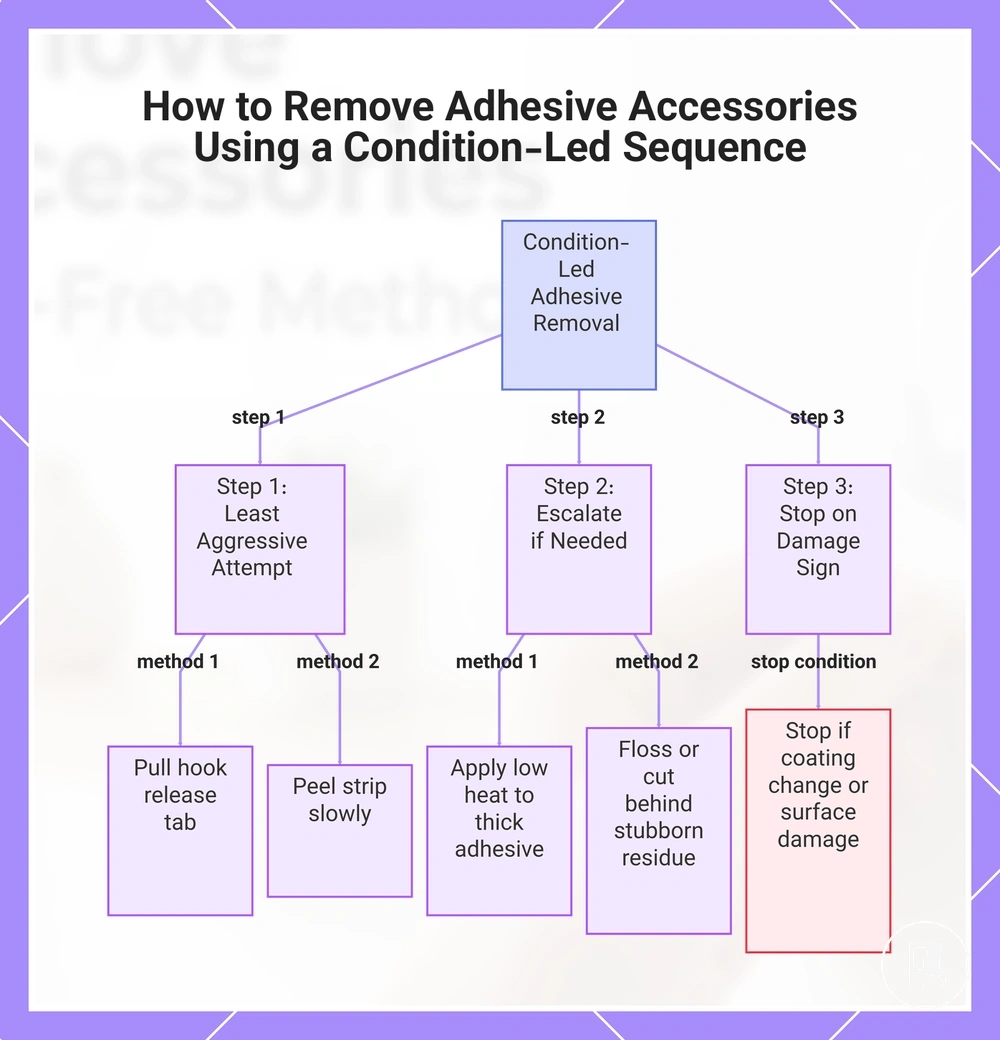
The safest approach is a condition-led sequence where each adhesive-backed accessory is released using the least aggressive method first. Heat, floss, or cutting methods are only applied when resistance increases or when a stop condition appears.
- Adhesive hook: pull along the release direction using the release tab; condition applies when tab is intact; stop condition is paint lifting or sudden resistance on the surface.
- Adhesive strip: peel slowly with steady pressure to maintain controlled separation; condition applies under moderate bond strength; stop condition is excessive stretch or coating stress on painted wall.
- Mounting tape with gentle heat: apply low, gentle heat to soften adhesive; condition applies for thick mounting tape or aged adhesive; stop condition is any visible change in paint, paper layer, or surface finish.
- Dental floss removal: slide dental floss or string behind adhesive pad or strip; condition applies for remaining pad sections or old adhesive; stop condition is high friction or abrupt snapping resistance.
- Cut-behind method: carefully separate adhesive layer from surface when tape is thick; condition applies for heavy mounting tape; stop condition is any sign of coating disruption or surface damage risk.
After removal, residue may remain depending on bond strength and surface finish, so the next step is careful residue handling without aggressive scraping to protect the coating.
This chart shows the safe condition-led approach to remove adhesive hooks, strips, pads, and mounting tape, with methods and stop conditions.
Release the tab or stretch strip in its intended direction
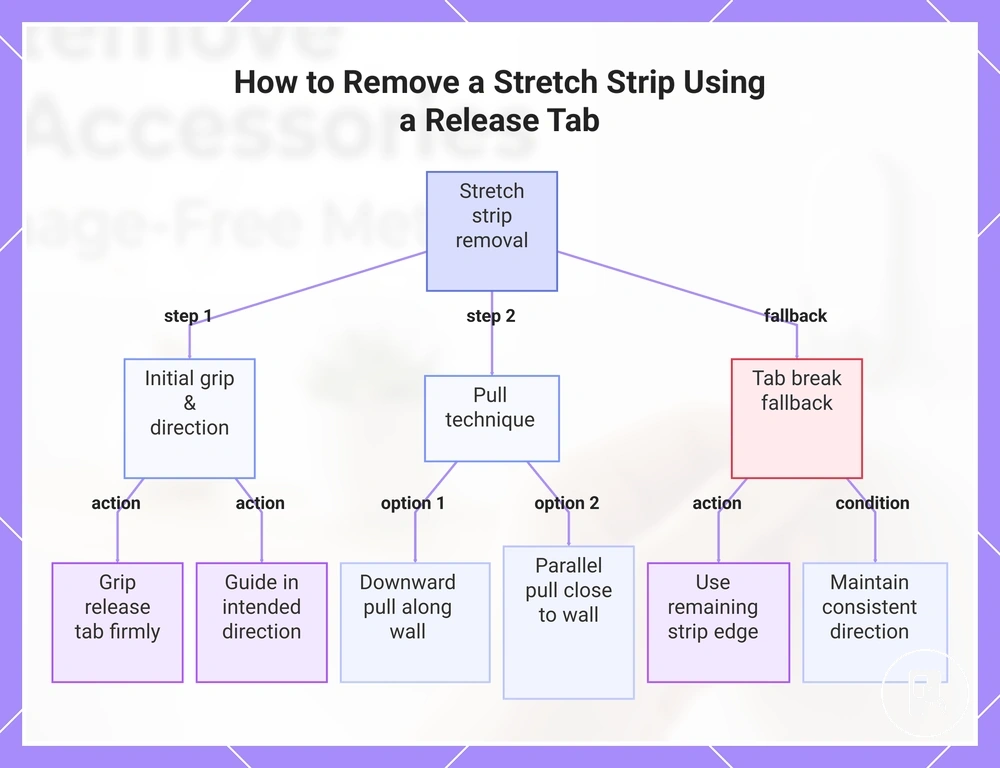
Direct answer: For a release tab or stretch strip, removal starts by gripping the release tab and guiding the stretch strip in its intended direction using slow pressure, following a downward pull or parallel pull along the wall surface rather than any outward force.
- Hand position on release tab: Grip the release tab firmly with controlled fingers while stabilizing near the adhesive strip; movement follows the stretch strip direction using slow pressure; stop condition is sudden resistance or uneven lifting from the wall surface.
- Downward pull along stretch direction: Apply a steady downward pull aligned with the stretch strip; keep motion smooth and close to the wall surface; stop condition is increasing resistance or unstable adhesive release.
- Parallel pull control: Maintain a low-angle parallel pull along the wall surface while following the strip’s stretch direction; avoid any outward force; stop condition is excessive stretch or loss of grip on the release tab.
- Tab break fallback: If the release tab breaks, continue using the remaining stretch strip edge with controlled slow pressure; keep direction consistent; stop condition is visible coating stress or adhesive instability.
:contentReference[oaicite:0]{index=0}
This chart shows the main steps for removing a stretch strip: proper grip, pull technique, and handling a broken tab.
Soften stubborn adhesive with gentle heat
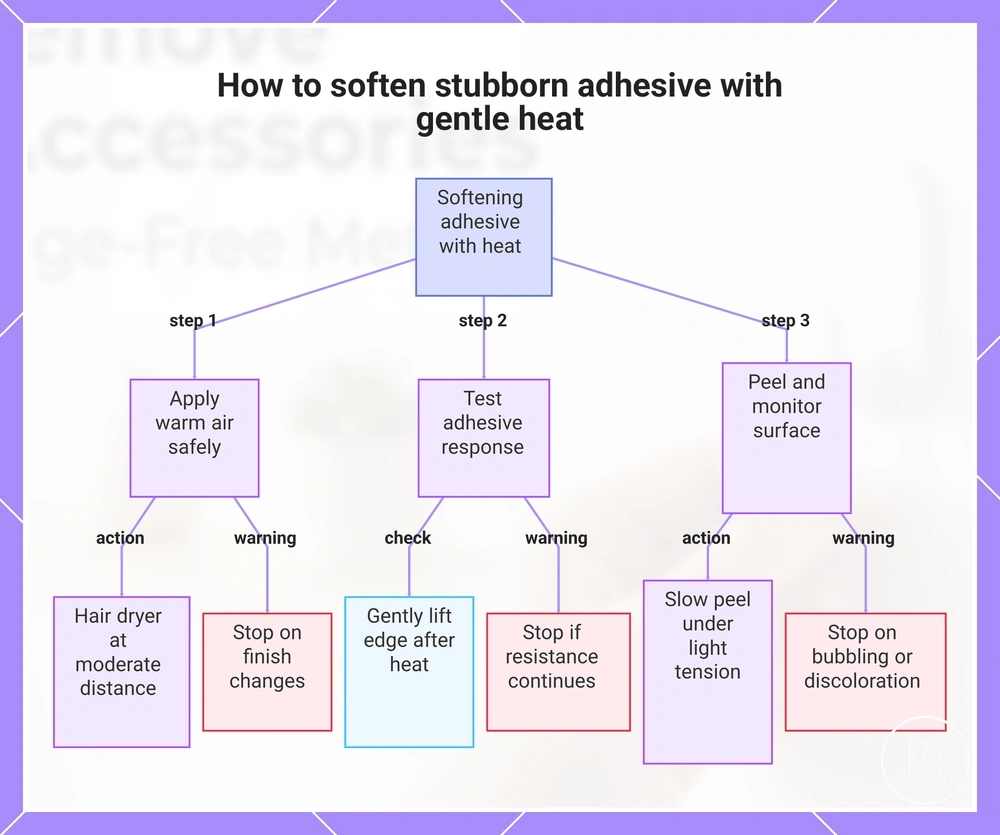
Stubborn adhesive can often be eased using gentle heat when the adhesive bond resists normal peeling. A hair dryer producing warm air may help loosen the adhesive bond by gradually creating a softened adhesive layer, especially when working on a painted wall where surface sensitivity can affect the result. The process remains conditional, and the stop signal is any bubbling, discoloration, or finish change.
This method depends on both adhesive strength and surface sensitivity. Gentle heat should only support peeling, not force separation, and it must stop immediately if the surface shows instability or reacts to warm air exposure.
- Apply gentle heat using a hair dryer at a safe, moderate distance so warm air spreads evenly over the adhesive bond; condition applies when the adhesive feels resistant; stop signal is any change in painted wall finish or surface softening.
- Test the softened adhesive by gently lifting an edge after heat exposure; condition applies when the adhesive bond begins to relax; stop signal is continued resistance or visible surface sensitivity.
- Proceed with slow peeling only if the softened adhesive responds under light tension; condition applies when heat softening is effective; stop signal is bubbling, discoloration, or coating instability.
:contentReference[oaicite:0]{index=0}
This chart shows the step-by-step process for safely softening adhesive on painted walls using a hair dryer, including key conditions and stop signals.
Cut behind the accessory when the release tab breaks
When a broken tab prevents normal release, the accessory must be separated from the adhesive using a controlled cut behind the unit rather than scraping the wall surface. This approach focuses on separation of the adhesive layer while keeping pressure away from the wall surface and reducing unnecessary damage risk.
- Use dental floss or a strong string in a slow sawing motion behind the accessory body; keep movement shallow and controlled; stop signal is strong resistance or increased stress on the wall surface.
- Guide a thin card behind the accessory to support the cut behind separation; maintain low-angle motion without force; stop signal is bending resistance or friction against the wall surface.
- Alternate dental floss and thin card movement to continue the cut-through method; keep pressure light and steady; stop signal is uneven detachment or visible wall surface stress.
- Allow remaining adhesive to release gradually as the bond weakens; avoid force-off motion; stop signal is lifting or damage risk on the remaining adhesive layer.
Stop if paint, paper, or coating begins to lift
Paint lift, coating movement, or exposed drywall paper means you must stop immediately. When bubbling, tearing, or visible separation appears, the surface is no longer stable during removal and the risk of surface damage increases if pressure continues.
Visible lifting signals that the surface layer is failing under stress. avoid wall damage applies here because continued pulling can extend paint lift, increase drywall paper exposure, or worsen coating separation depending on finish type and wall condition.
- Paint lift or peeling paint → stop immediately and reassess before continuing any removal action
- Bubbling or stretched finish → stop and avoid additional pressure that may expand coating damage
- Drywall paper exposure → stop to prevent tearing or deeper wall surface damage
- Coating movement or shifting layer → stop and reassess before making any repair decision
- Tearing or surface disruption → stop completely to avoid expanding the damaged area
Remove Suction, Tension, and Clip-On Accessories Without Forcing Them
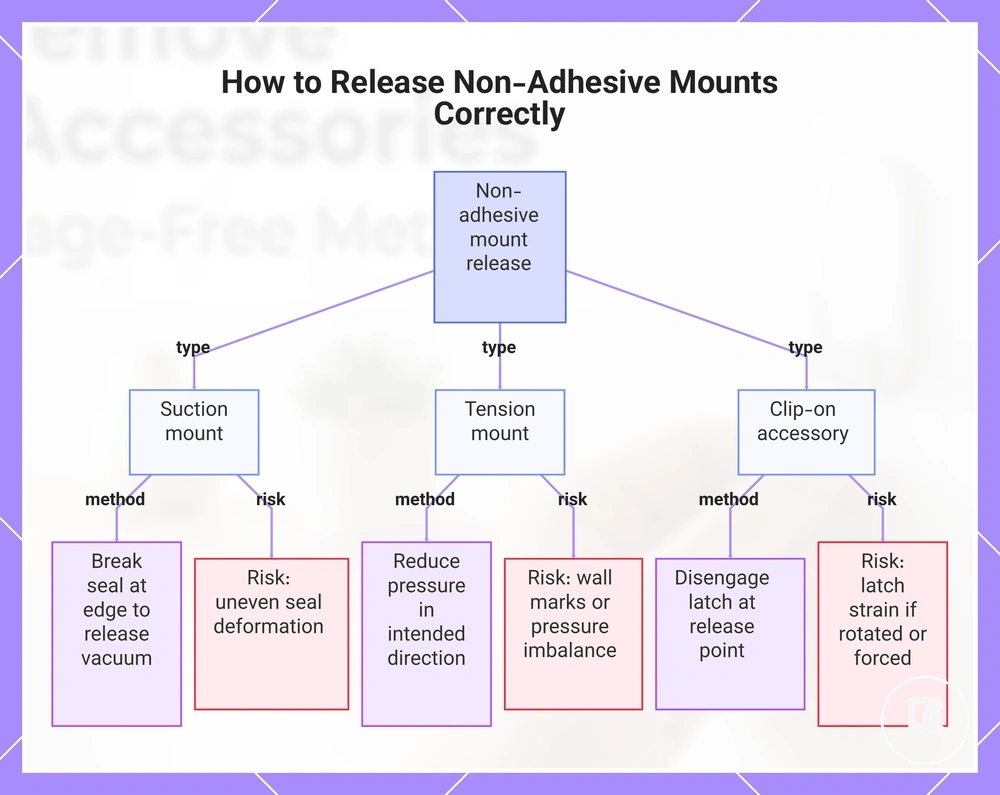
Non-adhesive mounts should be released at their mechanism rather than pulled. A suction mount works through a seal and trapped vacuum, a tension mount relies on controlled pressure direction, and a clip-on accessory depends on a latch release point. Each system is designed to separate through its own mechanism, so identifying the correct release point is essential before any movement begins.
These mounts separate differently from adhesive-based systems because they depend on mechanical or pressure-based holding rather than bonding. A suction mount releases when the seal is broken and air enters evenly, a tension mount loosens when pressure is reduced in the correct direction, and a clip-on accessory disengages when the latch is released. Twisting or yanking can misalign the release path and create unnecessary stress on the surface or mechanism.
- Suction mount → release by breaking the seal at the edge to release trapped vacuum → risk is uneven seal deformation if force is applied incorrectly → inspection point is smooth air entry before full detachment
- Tension mount → release by gradually reducing pressure in the intended direction → risk is wall marks or pressure imbalance if shifted suddenly → inspection point is whether tension loosens evenly before release
- Clip-on accessory → release by disengaging the latch at the release point → risk is latch strain if rotated or forced → inspection point is clean separation without resistance
Twisting or yanking any of these mechanisms can disrupt the release process and increase unnecessary stress on both the accessory and the surface.
This chart shows the correct release methods and key risks for each type of non-adhesive mount: suction, tension, and clip-on.
Clean Adhesive Residue Without Damaging the Wall
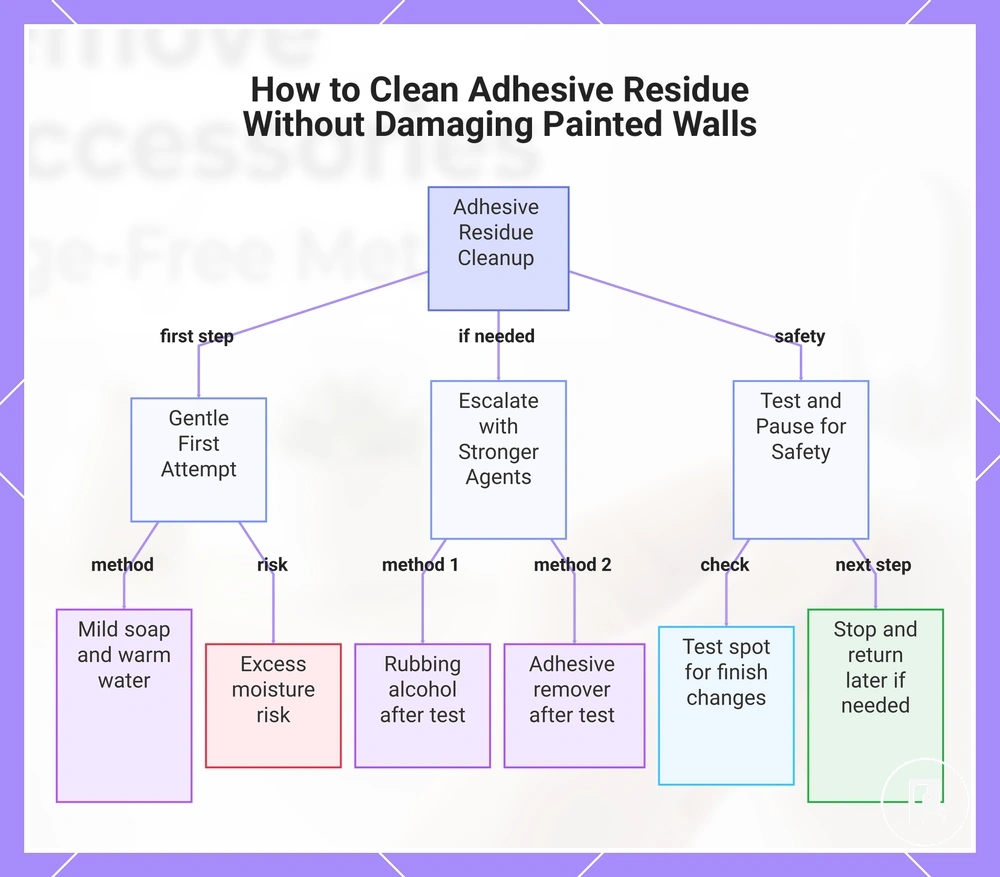
Adhesive residue cleanup should start with mild soap and warm water and only move toward stronger methods when the residue does not respond, because painted wall surface finish and drywall sensitivity can change how cleaning agents behave.
Sticky adhesive residue varies in thickness, softness, and bonding level depending on surface finish and exposure time. On a painted wall, light residue may release with mild soap and warm water, while more persistent glue residue may require rubbing alcohol or a tested adhesive remover. Each method depends on a test spot to confirm that the surface finish does not show discoloration or sheen change.
Cleaning should progress in controlled stages, starting with the least aggressive option and only escalating when needed based on residue response and surface behavior.
Adhesive residue that resists cleaning should not be forced in one attempt, as stopping or returning later can help avoid unnecessary surface stress and reduce risk to the coating.
- Mild soap and warm water → wipe gently → suitable for light adhesive residue → risk: excess moisture may affect sensitive painted wall finish
- Rubbing alcohol → apply after test spot → helps break sticky residue → risk: may change sheen on some surface finishes
- Adhesive remover → use only after testing → effective for stronger residue → risk: possible discoloration depending on surface finish
- Oil or vinegar solution → gentle application → may loosen glue residue → risk: uneven reaction on coated surfaces
- Stop or return later → reassess residue when dry → prevents overworking the surface → risk: none when used as controlled pause
This chart shows the recommended cleaning stages, testing requirements, and risk management steps for removing adhesive residue from painted walls safely.
Start with mild residue softening methods
Adhesive residue should be softened gradually using low-risk methods first so the surface finish is not stressed before stronger cleaning approaches are considered.
- Mild soap and warm water with a soft cloth → apply lightly to the residue and begin gentle softening → stop if the painted wall shows sheen change or surface absorbs unevenly.
- Warm water with controlled wiping pressure → use a soft cloth and wiping pressure to loosen residue without scrubbing → repeat only if residue begins to lift without surface resistance.
- Gentle oil application → apply a small amount to sticky residue and allow light dwell time → stop if the surface finish darkens or becomes uneven.
- Vinegar solution (light dilution) → test on a small area before wider use → wipe gently and stop if any discoloration or coating sensitivity appears.
- Reassess residue condition → if residue remains firm after mild softening, pause before escalating to stronger methods → avoid immediate force or repeated friction on the same area.
Test adhesive removers before using them on painted walls
Adhesive remover should always be tested on a hidden area of a painted wall before visible application to evaluate how the surface responds to dwell time, softening, sheen change, or discoloration.
- Hidden area test spot → apply a small amount of adhesive remover on a concealed section of the painted wall → wait and inspect for dwell time reaction and stop if sheen change or discoloration appears.
- Surface response check → observe the test spot for softening, paint disturbance, or uneven absorption → proceed only if the painted wall remains stable; otherwise pause further use.
- Controlled application → if the test spot shows no adverse reaction, apply adhesive remover lightly to the residue area → monitor dwell time and inspect for sheen change or discoloration → wipe gently and stop if instability appears.
- Decision outcome → proceed if no negative paint response occurs, pause if minor changes appear for reassessment, or stop completely if discoloration or surface weakening is observed.
:contentReference[oaicite:0]{index=0}
Avoid sharp scraping and excessive moisture
Sharp scraping and excessive moisture are avoidable damage triggers during residue cleanup on painted walls and porous surfaces such as drywall paper and sealed wood, where surface response can shift under pressure or prolonged water exposure.
- Sharp scraping → creates scratch risk on matte paint and sealed finishes → safer alternative is a plastic scraper or soft cloth with gentle pressure to reduce surface marking.
- Excessive moisture → can trigger drywall paper swelling and weaken surface layers → safer alternative is a soft cloth with limited water exposure instead of prolonged wet contact.
- Hard scraping pressure → may disturb paint adhesion or lift weakened coating layers → safer alternative is controlled, low-angle scraping with a plastic scraper.
- Water exposure on porous areas → can lead to matte paint dulling or uneven finish response → safer alternative is quick wipe use with a soft cloth and minimal moisture.
Use a soft cloth and plastic scraper with controlled pressure as safer alternatives to reduce the risk of surface damage during residue cleanup.
Check the Surface After the Accessory Is Removed
Surface condition after accessory removal should be classified as a cleanable mark, remaining residue, or actual damage so the next action can be selected correctly without over-treating the surface.
The key distinction is whether the result is an adhesive shadow, residue, sheen change, paint lift, exposed paper, or coating tear, since each outcome indicates a different level of surface impact and determines whether cleaning, waiting, or repair is needed.
| Surface result | What it suggests | Safe next action |
|---|---|---|
| Adhesive shadow | Light surface mark without structural change | Clean and recheck after drying |
| Residue or tacky feel | Remaining adhesive layer on the surface | Slow cleanup and wait before reassessing |
| Sheen change | Finish response from contact or pressure | Pause and avoid further treatment until stable |
| Paint lift or exposed paper | Surface layer damage beyond marking | Stop cleaning and proceed with repair before remounting |
| Coating tear | Structural surface finish failure | Avoid remounting and treat as repair-level damage |
After classification, proceed based on whether the surface is cleanable, requires slow residue treatment, or needs minor repair before any new accessory installation.
:contentReference[oaicite:0]{index=0}
When small marks need cleaning only
Small marks can be cleaned only when the surface remains a flat surface with no structural change, meaning the issue is limited to visible marking such as dust ring, adhesive shadow, light residue, or surface smudge rather than damage to the coating.
- Dust ring → indicates loose surface deposit on a flat surface → use a gentle wipe, then dry and recheck for remaining mark visibility.
- Adhesive shadow → indicates light residue trace after removal → apply a gentle wipe, allow to dry, then recheck without repeating aggressive cleaning.
- Light residue → indicates minor leftover adhesive on intact finish → use controlled gentle wipe, dry fully, and recheck surface clarity.
- Surface smudge → indicates superficial transfer mark with no coating change → wipe lightly, ensure dry surface condition, and recheck before any further action.
Cleaning is appropriate only when the surface stays intact and stable, and the final step is always to dry and recheck before deciding any further treatment.
:contentReference[oaicite:0]{index=0}
When lifted paint or coating needs repair
Lifted paint or coating means the surface has crossed from cleaning into coating repair, where damaged finish such as peeled finish, exposed drywall paper, or coating tear indicates that the surface layer is no longer stable.
- Lifted paint edge → indicates separation of paint film → pause immediately, let the area dry, and assess whether patch and repaint is required based on surface stability.
- Peeled finish area → indicates weakened surface layer → pause further handling, keep the surface dry, and evaluate coating repair needs depending on coating type.
- Exposed drywall paper → indicates deeper surface damage → pause contact, avoid moisture exposure, and consider patch preparation before any repaint step.
- Coating tear or broken finish → indicates structural surface failure → pause completely, dry the area, and assess repaint or repair guidance based on condition.
Next action depends on the extent of lifted paint, where coating repair steps such as patch, dry stabilization, and repaint may be required depending on surface condition.
:contentReference[oaicite:0]{index=0}