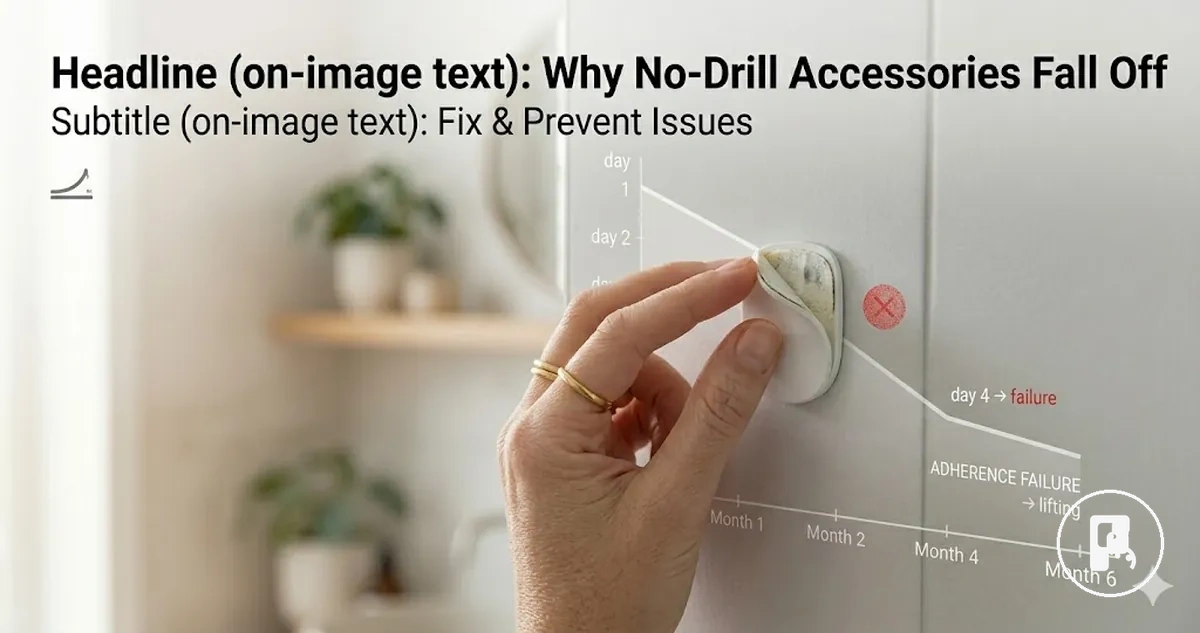
No-Drill Home Accessories Falling Off Problems
No-drill home accessories falling off usually happens when the adhesive bond or suction seal loses stable surface contact under real use conditions. In most cases, the issue is not a single defect but a combination of surface condition, mounting method, load pressure, and environmental exposure. When these factors weaken alignment, the accessory can loosen, drop, or detach over time depending on installation and usage. Drill-based hardware behavior is outside this scope, as this page concerns no-drill mounted systems only.
No-drill accessories falling off can be organized through a small set of failure variables that explain what is affecting the mounting point.
- Surface contact quality and whether dust, oil, or residue reduces adhesion
- Mounting method stability such as adhesive bond or suction seal performance
- Load stress from weight, pull direction, and uneven force distribution
- Moisture exposure that can weaken grip in bathrooms or humid rooms
- Worn or aging mounting parts that reduce holding consistency over time
Falling off refers to a mounting failure where a no-drill home accessory loses its adhesive bond or suction seal and can no longer maintain stable surface contact. This may appear as gradual loosening, edge peeling, or sudden detachment depending on how the failure develops. It is important to separate symptoms like sliding or dropping from underlying causes, since similar outcomes can result from different conditions such as surface contamination or seal leakage.
The diagnostic approach starts by matching the visible failure pattern to key variables like surface condition, load distribution, moisture exposure, and the state of the mounting interface. This helps narrow whether the issue relates to installation quality, environmental stress, or worn components. In many cases, understanding this pattern is necessary before any remount or replacement decisions, since different causes require different responses.
This issue is commonly seen in bathrooms, kitchens, and frequently used storage areas where moisture, heat, and repeated loading interact with the mounting surface. It can also occur in living spaces where uneven walls or higher-than-expected load creates gradual weakening. Recognizing these scenarios helps identify early warning signs such as edge lifting, reduced grip, or repeated loosening before complete failure occurs.
What Falling Off Means for a No-Drill Mount
Falling off in a no-drill mount refers to the loss of stable holding caused by weakened adhesive bond, suction seal, or surface contact. It describes the point where a no-drill home accessory can no longer stay fixed and begins to loosen, slide, or detach under load balance changes. This condition may come from either adhesive bond breakdown or suction seal failure, which behave differently at the mounting interface.

The same no-drill mount can show different falling off patterns depending on how the failure develops over time. Slow loosening often appears as gradual sliding or edge peeling, while sudden dropping usually reflects an abrupt loss of suction seal or adhesive bond under load. These symptom patterns help distinguish whether the issue is linked to surface contact weakening or load balance distribution.
Use the checklist below to identify what falling off means in practice by mapping visible symptoms to mounting behavior.
- Timing of failure: gradual loosening versus sudden drop
- Mount type: adhesive bond weakening or suction seal release
- Surface clue: reduced surface contact or visible peeling
- Load clue: shifting weight or uneven load balance
- Moisture clue: damp or humid conditions affecting grip
- Repeated symptom: recurring falling off after short reattachment
The same symptom of falling off can originate from different conditions inside a no-drill mount system. A loose mount, failed pad, or suction seal issue may all produce similar detachment behavior, but each reflects a different underlying cause path. This boundary is important because the correct interpretation depends on whether the issue starts from adhesive bond failure, suction seal instability, or compromised surface contact under load. A loose mount, failed pad, or suction seal issue may require different fixes.
Common Causes of No-Drill Accessory Mounting Failure
Mounting failure usually comes from a mismatch between surface, mounting method, load direction, room conditions, and surface preparation. These variables affect how the adhesive interface or suction interface maintains contact over time. When one or more conditions are misaligned, symptoms such as peeling, sliding, loosening, or dropping can appear in different combinations.
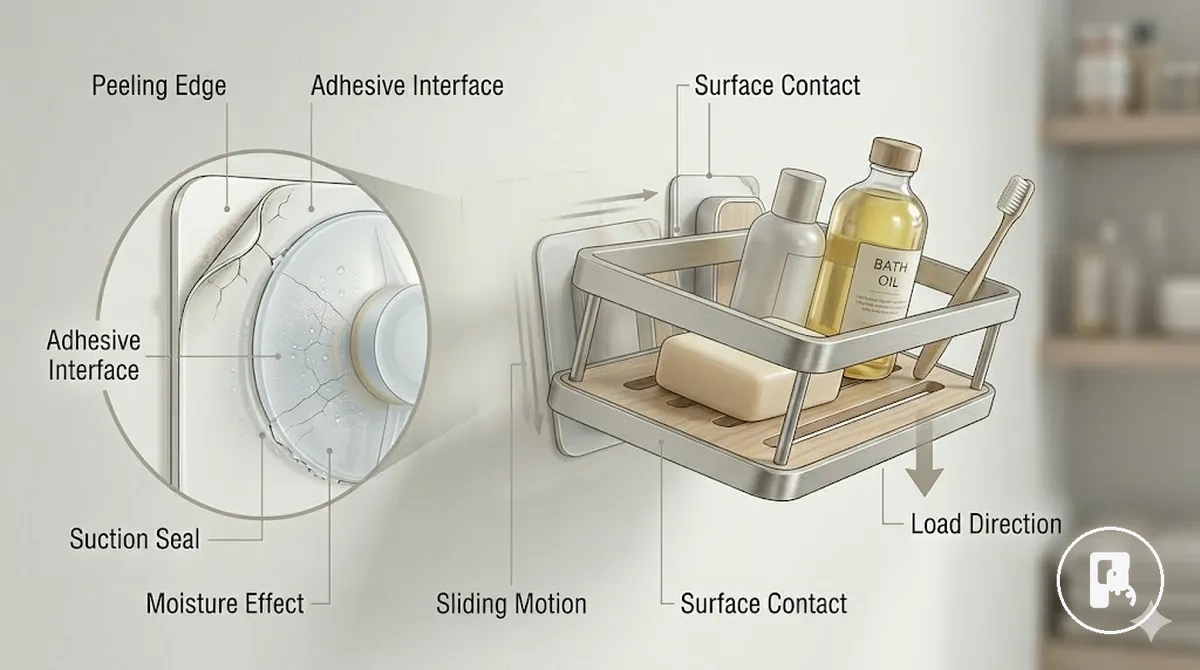
Common Causes of No-Drill Accessory Mounting Failure can be understood by mapping visible symptoms to likely conditions before any corrective action is considered. The image above shows how surface contact, load direction, and seal behavior connect to failure patterns.
The diagnostic pattern from Common Causes of No-Drill Accessory Mounting Failure shows that symptom behavior often reflects multiple interacting variables rather than a single issue. To interpret this correctly, it helps to compare mounting method behavior with surface condition and load direction. This is directly connected to mounting method failure points, where interface type changes how symptoms develop under stress.
For example, gradual loosening often indicates reduced surface contact under steady load direction, while sudden dropping may suggest suction interface instability or rapid adhesive interface separation. Peeling edges usually relate to edge-level contact loss, while repeated suction loss can indicate air leakage or inconsistent smooth surface contact. These patterns help separate visible symptoms from underlying mounting conditions.
| Symptom | Likely cause | Check | What it means |
|---|---|---|---|
| Peeling edges | Adhesive interface weakening | Inspect surface contact points | Edge-level bond loss starting |
| Sudden drop | Suction interface failure | Check seal and air leakage | Instant loss of grip |
| Slow sliding | Load direction imbalance | Observe weight distribution | Gradual loss of stability |
| Repeated suction loss | Surface mismatch or air entry | Check smooth surface fit | Seal cannot stabilize |
| Failure after cleaning | Residue or moisture disruption | Review surface condition | Contact quality reduced |
A typical scenario is a bathroom-mounted accessory that begins to peel at the edges after repeated moisture exposure, followed by gradual sliding under consistent load direction. This pattern reflects how surface condition, interface type, and environmental factors interact during use.
Surface Contamination and Poor Initial Contact
Dust, oil, soap film, limescale, fingerprints, or paint residue on the mounting area reduce initial contact and prevent a stable bond. Incomplete or uneven pressure during application on a dry surface can further weaken adhesion at the start. This often leads to edge lifting or early loss of grip before any load is applied.
Before remounting, check residue level, dryness, applied pressure, and any old adhesive layer that may interfere with contact. These factors determine whether the adhesive or suction interface can stabilize correctly, which is why it is important to clean surfaces before mounting.
Surface Contamination and Poor Initial Contact verification checklist helps confirm contact-related mounting issues:
- Residue: dust, oil, soap film, limescale, fingerprints, or paint residue affecting bond
- Moisture: insufficient dry surface condition reducing initial adhesion strength
- Pressure: uneven or incomplete application pressure weakening contact
- Old adhesive: leftover layer interfering with new bonding surface
- Edge lifting: early visible sign of poor initial contact failure
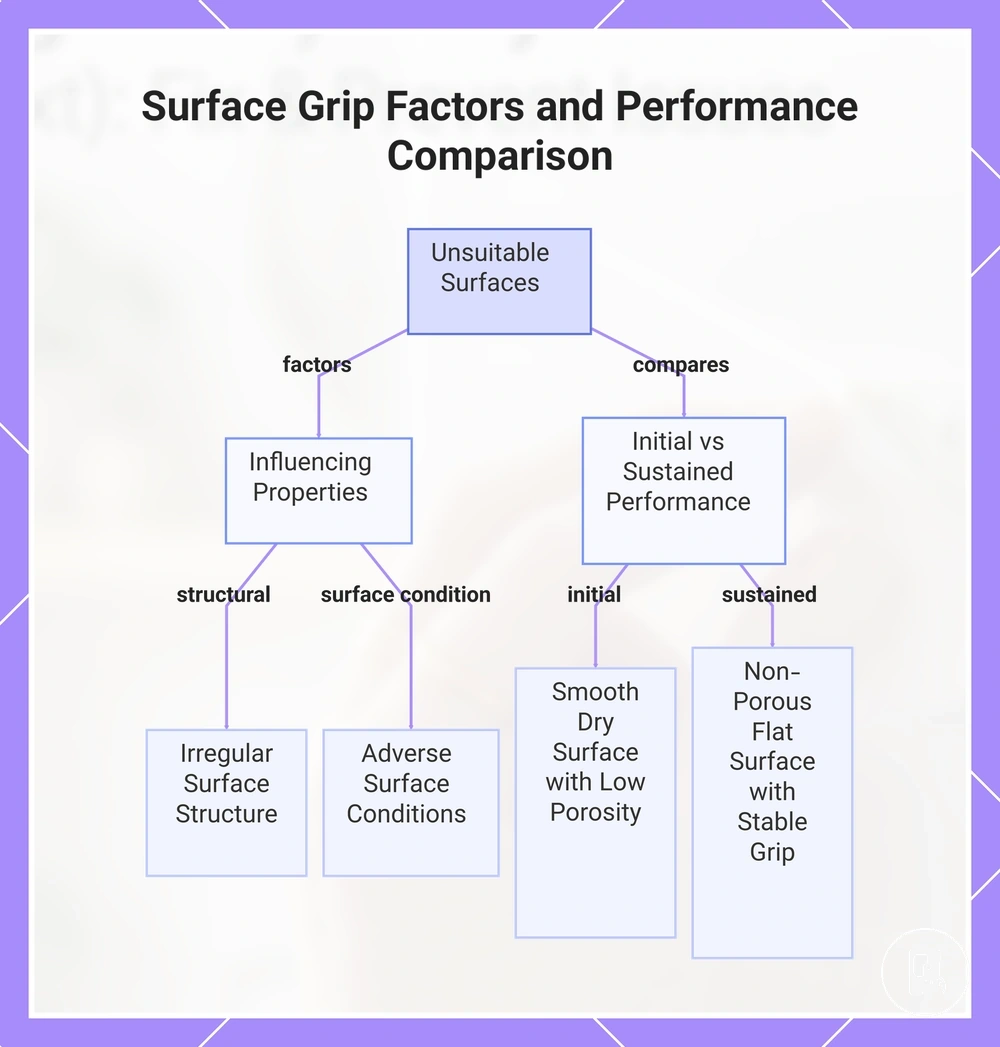
Unsuitable, Uneven, or Low-Grip Surfaces
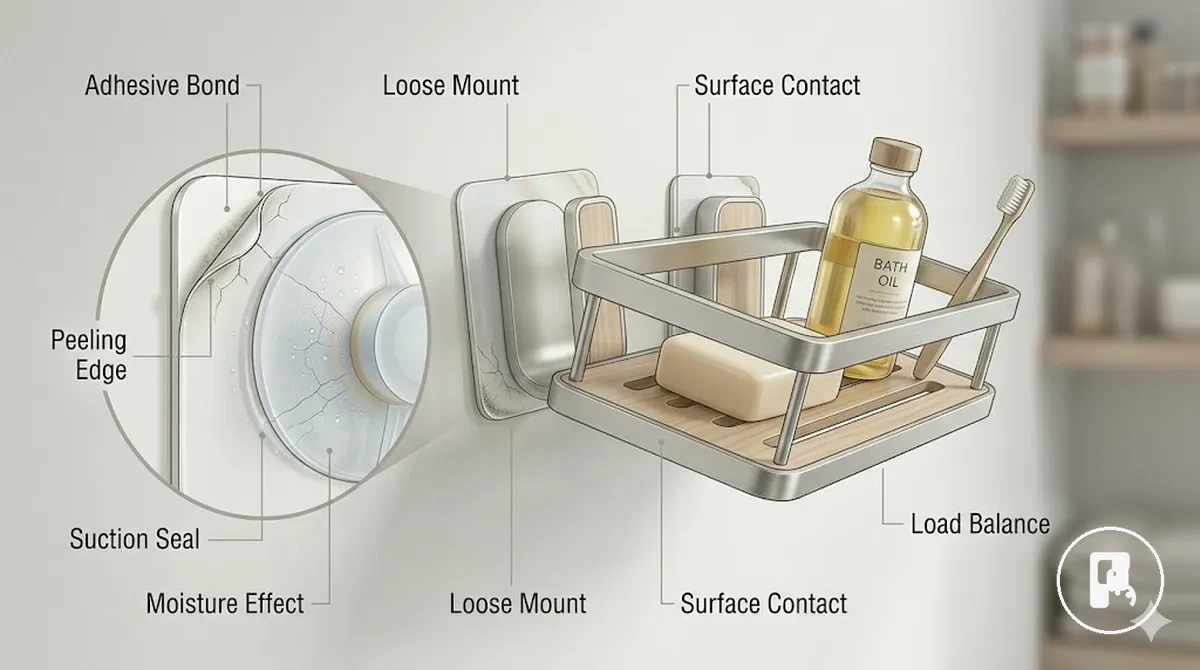
Unsuitable, uneven, or low-grip surfaces depend on textured surface, porous surface, powdery surface, damp surface, curved surface, coating, and flatness, all of which directly influence grip, bond strength, and suction seal reliability. Even when a surface is clean, these properties can prevent stable initial contact and reduce how well the mount holds under load.
Some surfaces reduce grip because their structure interrupts consistent contact or creates weak zones for adhesion and suction. In many cases, surface mismatch problems occur when texture, porosity, coating, or poor flatness prevents stable bonding behavior even after correct placement.
Compatibility contrast between initial contact and sustained hold under load shows how surface behavior changes performance:
- Accepts initial contact: smooth surface, stable flatness, low porosity, dry surface
- Maintains contact under load: consistent flatness, non-porous surface, stable grip, strong bond strength
On a damp or powdery surface, initial adhesion may appear stable, but grip weakens over time as moisture exposure or surface breakdown affects suction seal and coating stability under weight or movement.
This chart shows the surface properties that make a surface unsuitable for grip and contrasts the conditions needed for initial contact versus sustained hold.
Weight, Pull Direction, and Overcapacity Stress
Weight, pull direction, and overcapacity stress define how load behaves on a mount, and actual stress depends on more than just the object’s weight. Leverage, vibration, surface area, and off-center force can increase load impact and change how the holding limit responds, often resulting in peeling, sliding, or sudden drop even when the rated load appears sufficient. The key condition is how force is distributed under real use.
Stress can exceed the holding condition when rated load is interpreted without considering directional force or leverage effects. This is directly connected to load capacity mistakes, where load stress changes based on pull direction and contact behavior. In such cases, weight, held object, surface area, and off-center force combine to create overcapacity stress that destabilizes grip.
| Load factor | What to check | Failure signal |
|---|---|---|
| Weight vs rated load | Compare object load and holding condition | Gradual sliding |
| Pull direction | Check outward or downward force angle | Peeling |
| Surface area contact | Check contact spread and distribution | Edge lift |
| Leverage or vibration | Check movement or shifting force | Sudden drop |
Moisture, Heat, Aging, and Suction Seal Loss
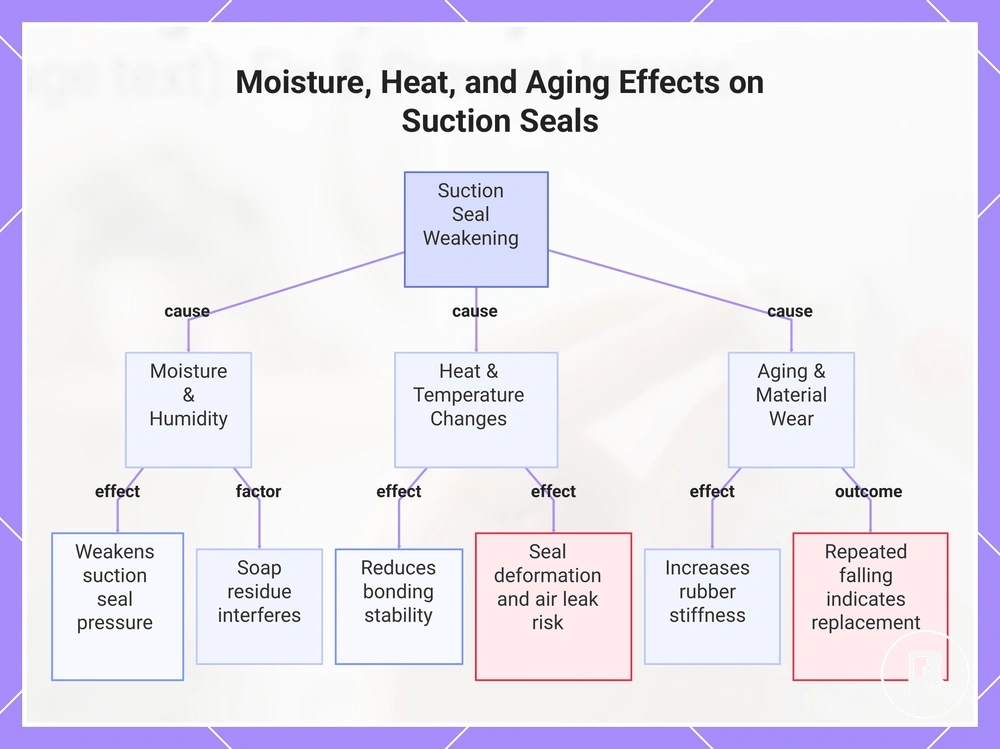
Moisture, heat, and aging can weaken suction performance over time by affecting suction seal stability, adhesive behavior, and material flexibility. Humidity, temperature changes, soap residue, and gradual adhesive wear may contribute to reduced grip, especially when rubber stiffness increases or seal deformation develops. These conditions often create repeated falling when the seal can no longer maintain stable air pressure.
Environmental conditions do not act alone, but they can accelerate weakening when combined with time-based wear or minor seal imperfections. In some cases, damp air, warm rooms, or repeated temperature changes interact with aging materials and reduce holding consistency, while surface fit and load behavior may still influence overall stability.
Moisture, Heat, Aging, and Suction Seal Loss can be understood through local cause-effect relationships:
- Humidity → increases moisture exposure, weakening suction seal pressure
- Heat → can contribute to adhesive wear and reduced bonding stability
- Temperature changes → may lead to seal deformation and air leak risk
- Aging → increases rubber stiffness and reduces flexibility at contact points
- Soap residue → can interfere with sealing performance and surface stability
Temporary suction loss may occur when environmental conditions fluctuate, and the seal can sometimes recover when conditions stabilize. However, when adhesive wear, rubber stiffness, or persistent seal deformation is present, repeated falling is more likely to indicate that the component may need replacement, depending on the overall mounting condition.
This chart shows how environmental factors and material aging cause suction seal weakening, leading to repeated falling and possible replacement.
How to Fix a Loose or Fallen No-Drill Accessory
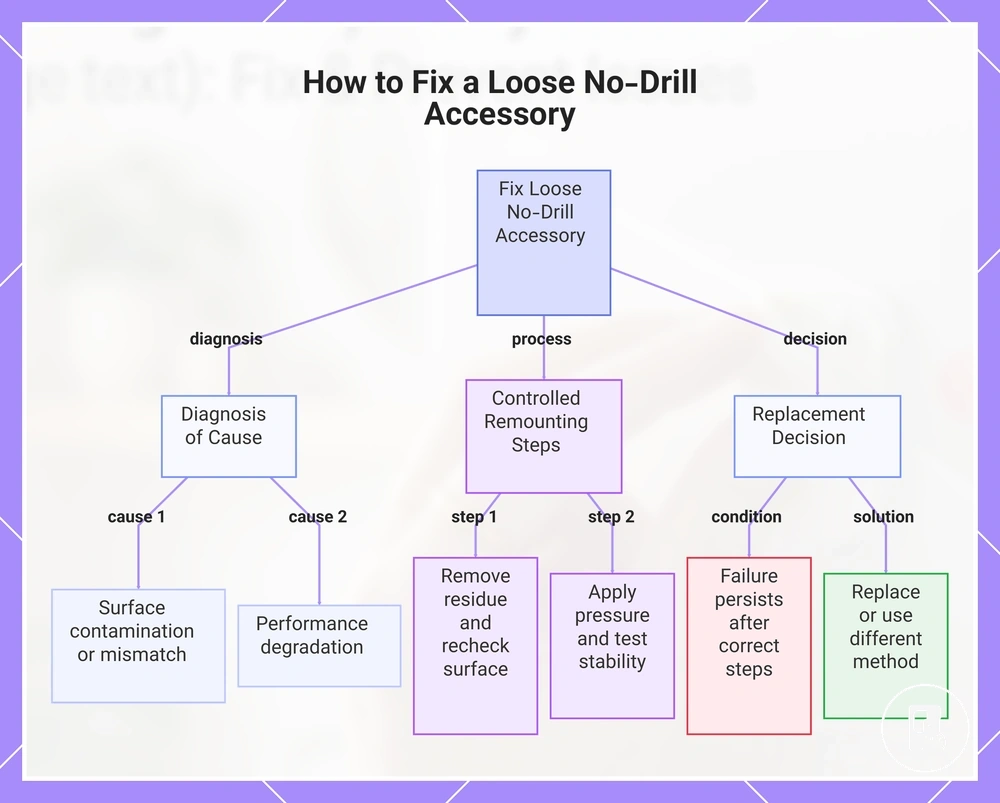
The fix for a loose accessory or fallen accessory depends on diagnosis of the cause, such as surface contamination, surface mismatch, overloading, adhesive wear, or suction seal loss. Correct diagnosis before action is necessary because each condition changes whether the fix can rely on reuse or requires replacement.
How to Fix a Loose or Fallen No-Drill Accessory starts with controlled handling of the loose accessory or fallen accessory and preparing the surface based on diagnosis. Safe removal of residue, surface recheck, and drying time management are required before any remount attempt, since incomplete preparation can reduce pressure effectiveness and reuse reliability.
- Remove the loose accessory or fallen accessory carefully to avoid spreading residue or damaging the mounting interface (stop if material is tearing).
- Clear visible residue from both surface and accessory base until contact areas are free from obstruction (stop if surface damage appears).
- Perform a surface recheck to confirm smooth contact conditions and detect any mismatch or unevenness (stop if instability is structural).
- Allow proper drying time to ensure moisture or damp air does not interfere with adhesion or suction seal performance (stop if humidity remains high).
- Reposition the mounting interface and apply steady, even pressure across the contact area (stop if pressure cannot be maintained evenly).
- Reduce load before testing by minimizing weight or stress on the accessory during initial hold (stop if load reduction is not possible).
- Test stability and observe for early signs of sliding, peeling, or air leak before full reuse confirmation (stop if failure reappears).
After remounting, reuse depends on whether adhesive wear or suction seal loss has already progressed. If stability does not hold after correct diagnosis, controlled cleaning, and pressure application, continued reuse may not restore performance under normal conditions.
The decision point is when repeated failure continues despite proper diagnosis and correct remounting steps. In such cases, replacement or a different mounting method becomes the safer option, depending on overall condition and reuse reliability.
This chart shows the diagnosis of causes, the controlled remounting steps, and the decision to replace for a loose or fallen no-drill accessory.
Recleaning and Remounting Adhesive Accessories
Recleaning and remounting an adhesive accessory is reasonable only when the adhesive accessory and mounting surface remain suitable and the issue is mainly related to old adhesive, residue, or weakened contact. If the surface is damaged, powdery, or the adhesive pad is contaminated, remounting may not restore stable performance reliably.
Recleaning and Remounting Adhesive Accessories rebuilds surface contact by removing old adhesive, performing residue-safe cleaning, and preparing a dry surface before applying a fresh pad. The process depends on correct alignment, firm pressure, and adequate cure time, while stability should always be tested under reduced load to avoid early failure.
Recleaning and Remounting Adhesive Accessories follows a controlled sequence to restore contact safely:
- Remove old adhesive carefully from both the adhesive accessory and mounting surface (stop if paint or coating begins to lift).
- Perform residue-safe cleaning to eliminate leftover bond material (stop if surface becomes unstable or powdery).
- Ensure a fully dry surface before reapplication (stop if moisture or damp conditions remain).
- Apply a fresh pad and complete alignment before contact (stop if proper positioning cannot be achieved).
- Apply firm pressure evenly across the adhesive accessory (stop if pressure distribution is uneven).
- Allow cure time without applying load to the accessory (stop if movement or slipping appears early).
Even after correct remounting, reduced load is necessary during the initial use phase. Damaged paint, weak wall surfaces, or contaminated adhesive pads may still reduce reliability, making replacement or an alternative mounting method safer when repeated failure occurs.
Re-Seating Suction Cups After Seal Failure
Re-Seating Suction Cups After Seal Failure refers to restoring grip of a suction cup when seal failure occurs and the suction cup, flat surface, and seal edge can still form a stable seal again using a clean cup condition. Reseating is only reasonable when rim condition is intact, air leak is not persistent, and the suction cup can still generate seal pressure on contact. If the cup edge is damaged or the seal cannot form consistently, the intact-edge condition is not met.
Re-Seating Suction Cups After Seal Failure starts with checking a clean cup and flat surface condition to rebuild seal pressure. The process focuses on restoring contact between a clean cup and smooth surface without trapped air disrupting the seal.
- Clean cup thoroughly to remove dust or residue and ensure a clean cup surface (stop if cracks or stiffness are visible).
- Inspect rim condition to confirm the suction cup edge is smooth and not deformed (stop if warped or cracked areas are present).
- Check flat surface to ensure it is even and suitable for sealing (stop if uneven texture prevents proper contact).
- Apply light moisture only if needed to support temporary seal pressure (stop if excess moisture causes slipping or instability).
- Press with pressure evenly across the suction cup to reseat and check for air leak (stop if air leak persists after repeated pressing).
If the suction cup is warped, cracked, or has stiff rubber that prevents proper rim condition contact, reseating should not be attempted further. In such cases, repeated seal failure indicates the component is no longer suitable for reuse under normal conditions.
When to Replace Pads, Strips, or Suction Cups
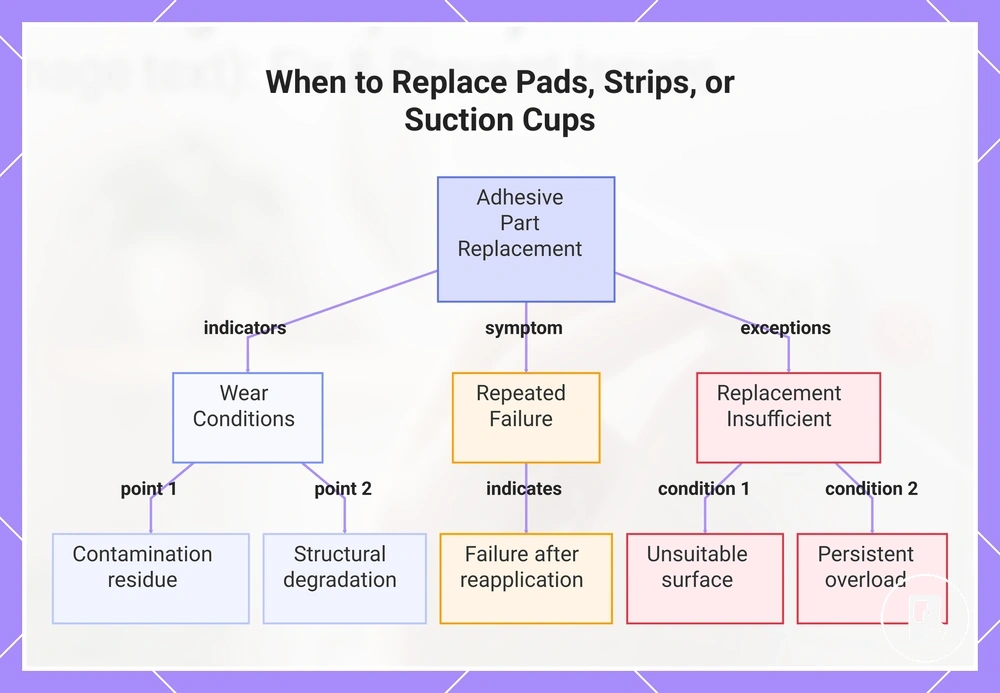
Replace adhesive pads, adhesive strips, or suction cups is usually the better choice when the mounting interface is contaminated, stretched, cracked, dried out, deformed, or has shown repeated failure. These conditions indicate the worn part can no longer maintain stable contact under normal use, especially when repeated failure continues after reapplication.
Adhesive pad, adhesive strip, and suction cup replacement is typically required when residue buildup or contamination prevents proper bonding, or when stretching and drying out reduce material performance. A cracked or deformed suction cup also weakens seal consistency and increases failure risk. Replacement decisions should always consider fit conditions, since a new pad or stronger strip still depends on surface compatibility and load limits.
Part replacement should be separated from changing the mounting method, because repeated failure caused by unsuitable surfaces or persistent overload may require a different approach instead of only swapping consumable parts. Adhesive pads, strips, or suction cups are appropriate for wear-related issues, but when failure continues under the same conditions, the mounting system itself may no longer be suitable for the surface or usage context.
When to Replace Pads, Strips, or Suction Cups decision checklist helps separate repair from replacement:
- Contamination: adhesive pad or strip affected by dust, oil, or residue
- Stretching: adhesive strip losing structural integrity or alignment
- Cracking: suction cup showing visible cracks or edge damage
- Dried out: material losing flexibility and bonding response
- Deformation: pad or suction cup shape no longer stable
- Repeated falling: failure continues after reapplication attempts
- Unsuitable surface: mounting surface cannot support stable contact
This chart helps determine when to replace adhesive mounting parts based on wear conditions, repeated failure symptoms, and exceptions where replacement alone may not be sufficient.
How to Prevent No-Drill Accessories from Falling Again
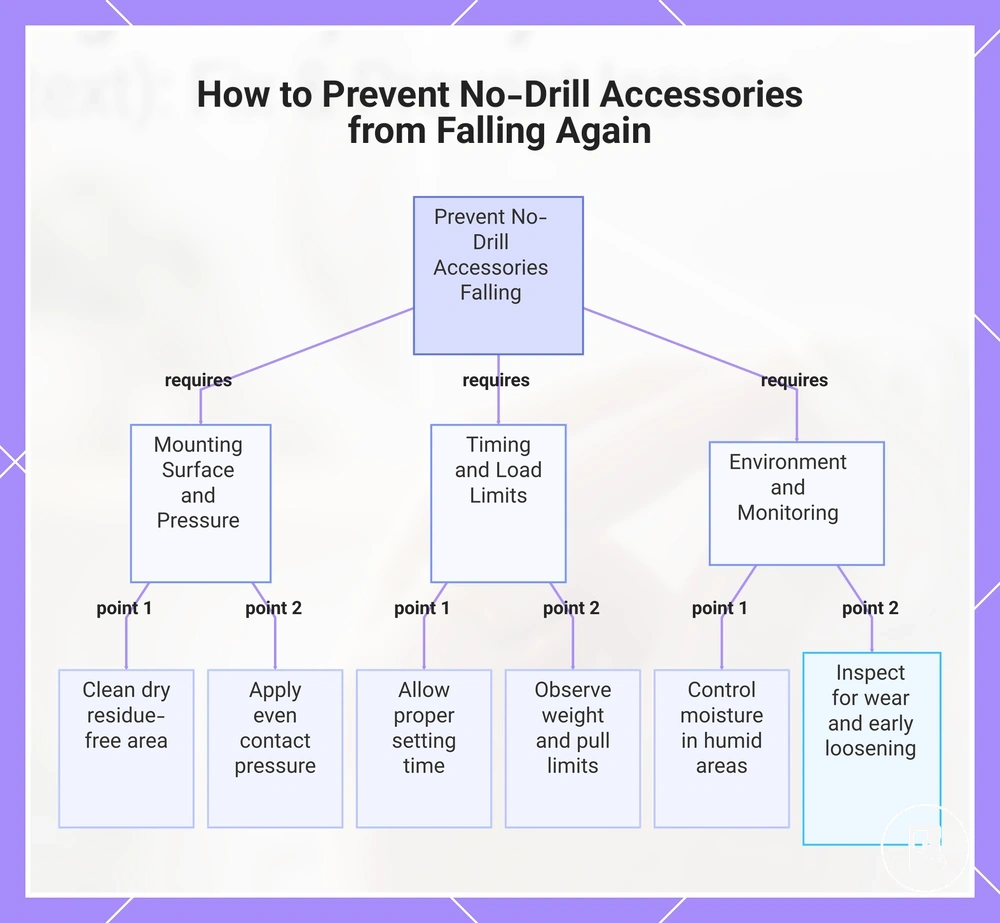
Prevent no-drill accessories from falling depends on matching mounting method, surface preparation, load limits, contact pressure, waiting time, moisture control, periodic inspection, and early loosening signs. These conditions must work together to reduce failure risk, and their effectiveness may vary based on surface type and environmental exposure.
How to Prevent No-Drill Accessories from Falling Again relies on recurring checks that help identify wear before it develops into repeated failure. Monitoring surface condition, bond stability, and load behavior helps maintain hold over time and reduces unexpected loosening. The preventive checklist below summarizes what should be verified regularly.
In bathrooms, kitchens, and other high-moisture environments, prevention depends strongly on moisture control combined with correct surface preparation and consistent inspection. Steam, splashes, and temperature variation can weaken contact areas gradually, making early loosening more likely around edges or load points.
Preventive checklist for How to Prevent No-Drill Accessories from Falling Again:
- Surface preparation: ensure clean, dry, and residue-free mounting area
- Contact pressure: apply even pressure to stabilize bond or suction seal
- Waiting time: allow proper setting time before applying full load
- Load limits: avoid exceeding intended weight or pull stress direction
- Moisture control: reduce exposure in humid or wet environments
- Periodic inspection: check for wear, edge lift, or weakening grip
- Early loosening: monitor initial movement or slipping as warning signs
This chart shows the key preventive measures and checks to avoid no-drill accessories falling again, grouped into mounting conditions, timing and load, and environmental monitoring.
When a No-Drill Accessory Is Not Suitable for the Use Case
A no-drill accessory is not suitable for the use case when the surface condition, load type, moisture exposure, safety risk, or expected permanence exceeds what the mounting method can support. This decision depends on whether the use case aligns with the structural limits of the mounting method under real-world conditions.
Suitability should be judged before any remount attempt by evaluating how surface condition, load type, moisture exposure, safety risk, and consequence of failure interact in the actual environment. A weak or unstable setup, frequent movement, or high-risk placement may indicate a poor fit even if initial attachment appears stable. In such cases, the decision is driven by whether the mounting method can safely match the required conditions.
When a no-drill accessory is not suitable for the use case, replacing worn pads may address localized failure, but it cannot resolve a fundamentally unsuitable use case where the surface condition or load type exceeds the limits of the system. For broader context, refer to no-drill home accessories when reassessing the overall mounting approach.
Suitability decision checklist for when a no-drill accessory is not suitable for the use case:
| Suitability criterion | Warning signal | Better decision |
|---|---|---|
| Use case | Application requires long-term fixed stability | Reconsider mounting method |
| Surface condition | Rough, porous, or unstable contact area | Change surface preparation or mounting approach |
| Load type | High leverage or uneven weight distribution | Reduce load or switch system |
| Moisture exposure | Frequent steam, splash, or humidity cycles | Improve moisture control or reconsider setup |
| Safety risk | Failure could cause injury or damage | Use a more secure mounting approach |
| Consequence of failure | Repeated detachment or high-impact falling risk | Re-evaluate suitability entirely |