Surface Preparation for No-Drill Home Accessories
Surface preparation is the process of making the mounting area clean, dry, stable, and residue-safe for no-drill home accessories so adhesive strips, suction cups, hooks, and pads can establish consistent contact quality and support more reliable holding strength over time.
Dust, oil, soap film, moisture, and weak or peeling paint can interfere with how no-drill home accessories interact with a wall surface, tile, or glass. These conditions reduce contact quality between the mounting surface and the adhesive or suction interface. In many cases, performance varies depending on how stable and residue-free the surface remains after basic preparation steps.
Adhesive strips, suction cups, mounting pads, and hook-based systems all depend on how evenly they sit on the prepared area. A clean surface allows adhesive layers to spread more uniformly, while a dry surface supports better suction behavior on smoother materials like glass or glossy tile. Surface preparation remains separate from full installation because it focuses only on readiness, not application mechanics.
Before any mounting begins, surface preparation typically involves checking surface condition, removing visible residue, and ensuring the area is dry and stable enough for contact. It also includes avoiding common mistakes such as leaving cleaning film or ignoring surface texture differences. These steps help create a more predictable mounting area without replacing compatibility or installation requirements.
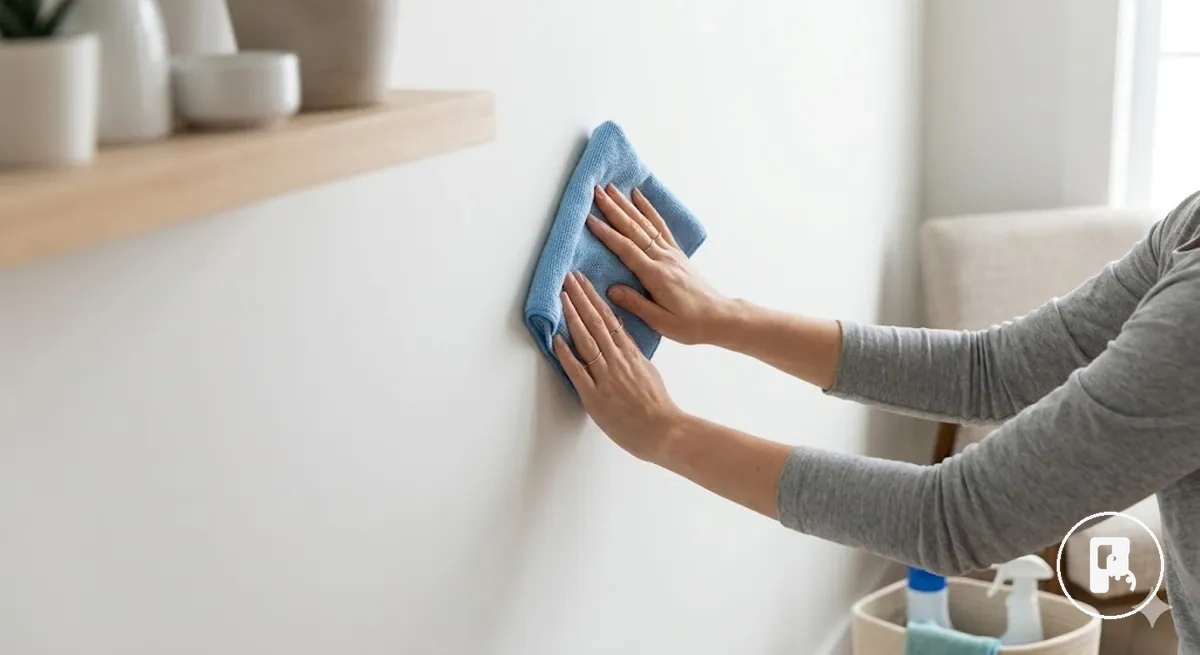
Why clean surfaces matter before no-drill mounting
Clean surfaces matter before no-drill mounting because dust, oil, grease, soap film, moisture, and cleaner residue can weaken contact quality between adhesive mounting or suction seal and the mounting surface. These contaminants interrupt stable interaction between the surface and no-drill home accessories. Results can vary depending on surface finish, load, and humidity, so cleaning alone does not guarantee holding strength.
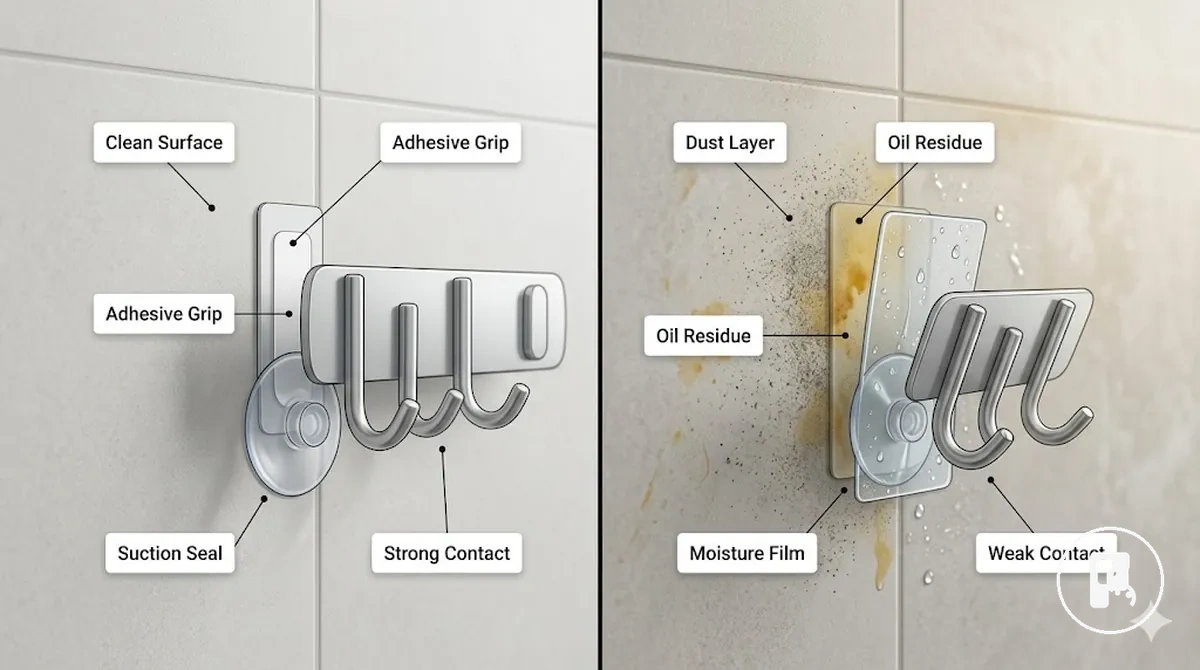
Dust, grease, soap film, moisture, and cleaner residue reduce contact quality by creating unstable layers between the mounting surface and adhesive or suction interface. Adhesive mounting may lose grip when surface film prevents full contact with the clean surface. A suction seal can weaken when moisture or residue disrupts stable sealing conditions on tile or glass.
An adhesive strip placed on greasy kitchen tile may show reduced grip because oil interferes with surface contact. A suction cup on a damp bathroom wall may lose stability when moisture breaks the seal. These scenarios show how surface condition directly influences mounting behavior.
- Dust layer reduces direct adhesive contact and weakens grip
- Oil or grease creates slippery residue that lowers contact quality
- Soap film interferes with suction seal on smooth surfaces
- Moisture disrupts stable suction and reduces holding strength
- Cleaner residue can form hidden barriers between surface and backing
Check whether the surface is ready for mounting
Surface is ready when it is stable, clean, dry, and suitable for the mounting method used for no-drill home accessories. This means the mounting area can support consistent contact without shifting, flaking, or excess residue interference. Readiness is evaluated through condition-based criteria rather than assuming any wall or finish is automatically suitable.
Readiness checks focus on whether stable surface, smooth surface, and sealed surface conditions are present before mounting. Dust, oil, moisture, peeling paint, and visible damage reduce reliability in contact quality. These checks separate initial surface readiness from full surface compatibility, which depends on accessory type and mounting method.
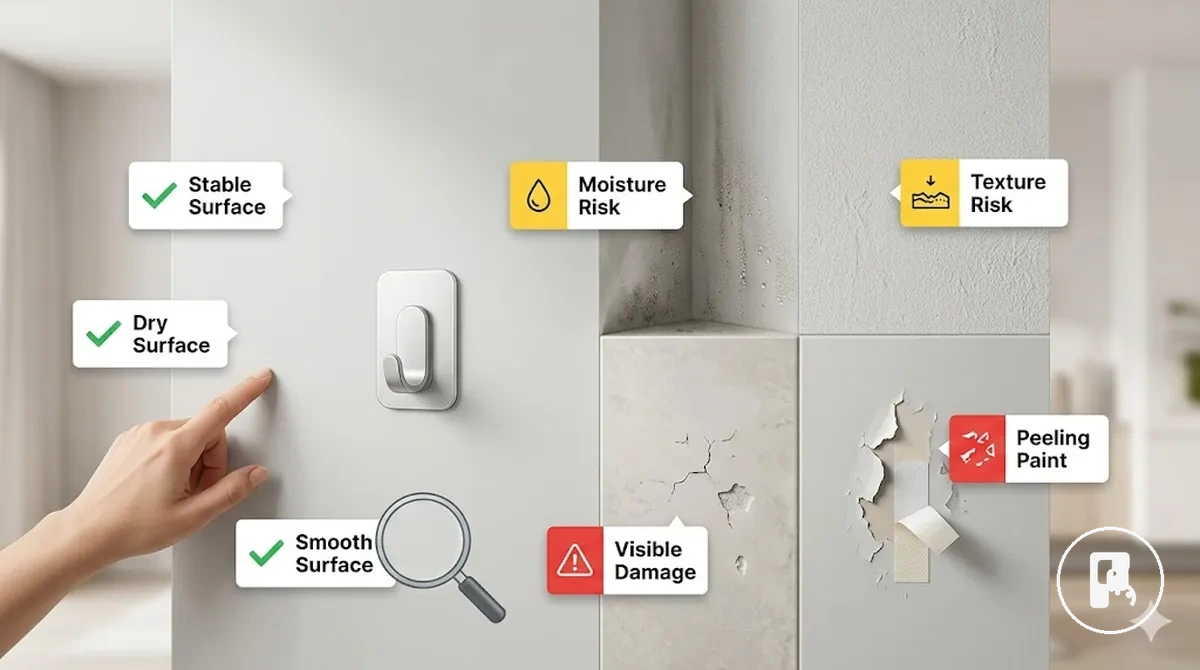
Check whether the surface is ready for mounting and use the checklist below to verify key conditions that affect no-drill performance. The list organizes surface signals that indicate whether the mounting area is suitable, needs caution, or should be avoided.
- Stable surface: no movement or loose layers affecting contact quality
- Smooth surface: minimal texture for consistent adhesive or suction seal
- Dry surface: no moisture weakening mounting grip or seal
- Dust or oil: presence increases risk of weak adhesion or slip
- Peeling paint: reduces surface integrity and raises lifting risk
- Visible damage: cracks or gaps interrupt uniform mounting contact
- Texture or grout lines: may disrupt suction seal or even contact
- Cleaner residue: can create hidden barrier affecting adhesion
A surface may pass readiness checks but still require correct matching with the intended mounting method. This is where surface compatibility becomes important, as final suitability depends on both surface condition and accessory requirements.
Stable, smooth, sealed, and dry surfaces
Stable, smooth, sealed, and dry surfaces are easier to prepare for adhesive or suction contact because they allow more continuous contact between the mounting area and the accessory. A stable surface reduces movement, while a smooth surface supports more even adhesive contact or suction contact. These conditions improve preparation reliability, but actual adhesion performance still depends on accessory design, load, and surface limits.
Stable, smooth, sealed, and dry surfaces group the main favorable conditions that support easier preparation before no-drill mounting. The following points describe how each condition contributes to more reliable preparation within the surface readiness context.
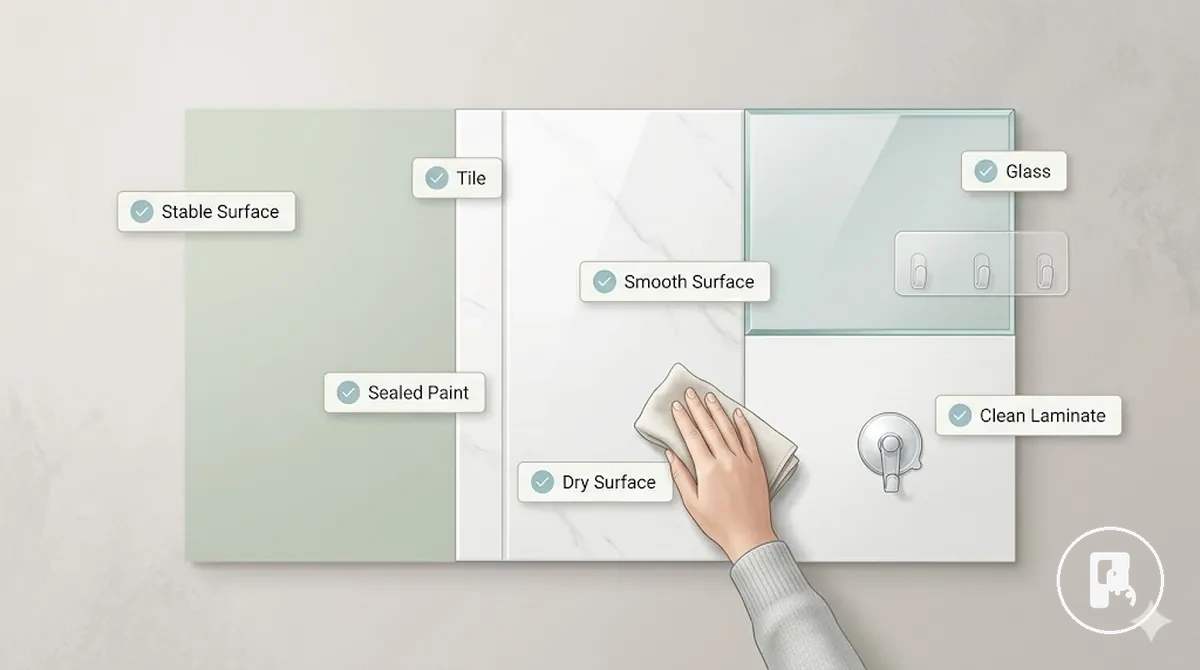
- Stable surface: supports consistent adhesive contact by reducing movement
- Smooth surface: enables continuous contact for adhesive strip or suction contact
- Sealed surface: sealed paint reduces loose coating and supports contact continuity
- Dry surface: moisture-free mounting area improves adhesive and suction contact quality
- Glass and tile: smooth materials that help suction contact sit flat and stable
- Clean laminate: flat surface that supports more even adhesive contact distribution
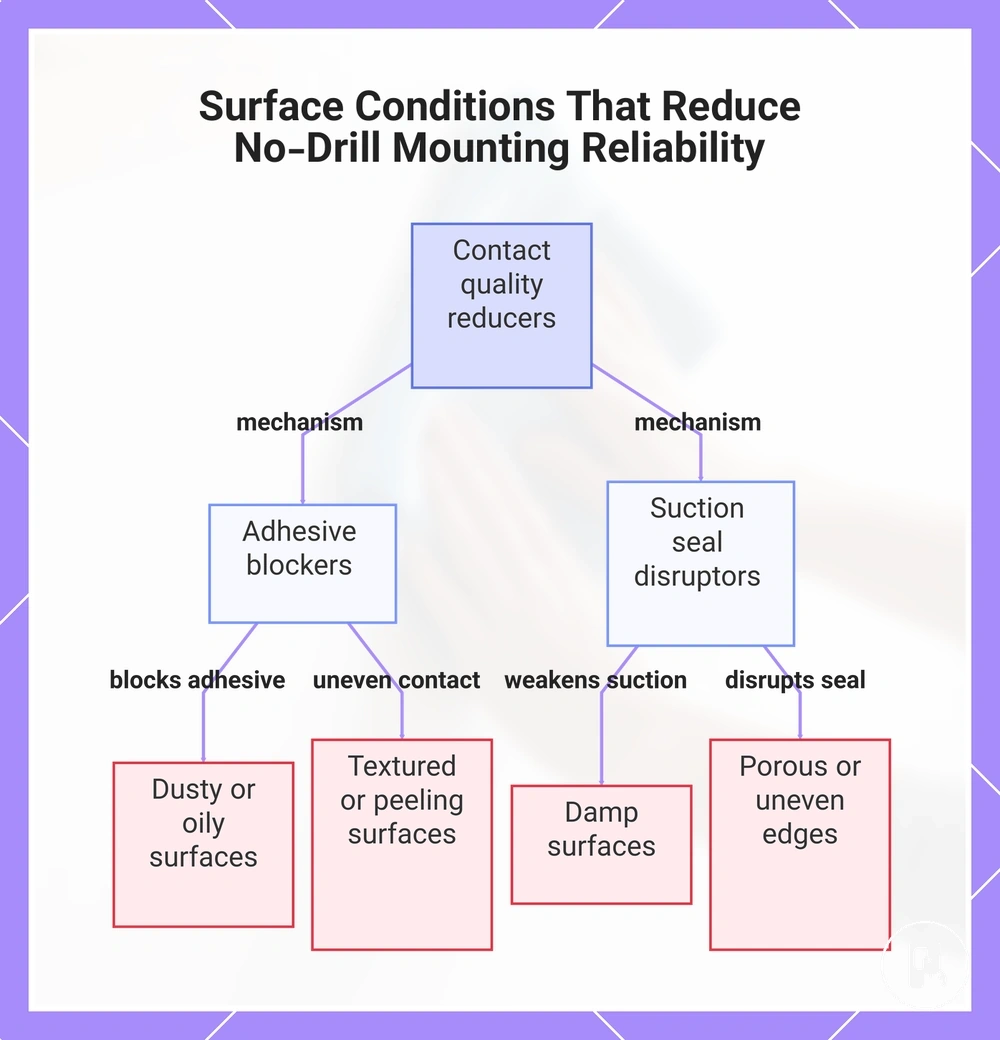
Dusty, oily, damp, textured, or peeling surfaces
Dusty, oily, damp, textured, or peeling surfaces reduce contact quality because they interrupt stable interaction between the mounting area and no-drill accessories. A dusty surface or oily surface can block consistent adhesive contact, while a damp surface weakens suction contact and increases instability. A textured wall or peeling paint condition adds uneven structure that makes preparation less reliable, so these surfaces require caution before mounting decisions are made and can increase mounting risk.
Dusty, oily, damp, textured, or peeling surfaces group key warning conditions that signal mounting risk and reduced preparation reliability. The list below diagnoses how each condition interferes with contact stability and helps identify when the mounting area may need caution.
- Dusty surface: blocks adhesive contact and increases mounting risk
- Oily surface: creates slip layer that weakens adhesive performance
- Damp surface: moisture reduces suction seal and increases release risk
- Textured wall: uneven contact reduces adhesive pad effectiveness
- Peeling paint + chalky paint: loose coating disrupts adhesive strip contact and increases surface failure risk
- Porous tile + grout gaps: interrupt suction cup seal and make contact unreliable
- Uneven edge: disrupts alignment and reduces consistent contact area
This chart groups surface conditions that interfere with no-drill mounting contact and explains their specific interference mechanisms.
Choose residue-safe cleaning materials
Residue-safe cleaning materials are cleaning options that remove dust, grease, and light contamination without leaving a slippery residue or coating on the surface finish. These materials support stable adhesive contact and suction contact by maintaining a clean mounting area after wiping. Their effectiveness depends on surface finish, contaminant type, and how the material interacts with the wall surface.
Choose residue-safe cleaning materials depends on surface finish, contaminant type, and mounting method, because each material can remove dirt while also introducing different residue risks. The table below organizes common materials by use case and potential surface impact so selection stays aligned with preparation needs.
Household sprays or scented wipes may leave a thin film that can create slippery residue on the surface finish. This residue may interfere with adhesive contact or suction stability even when the surface appears visually clean. A small test area is often more reliable before full application when material behavior is uncertain.
| Cleaning material | Useful condition | Residue or surface risk | Safer use note |
|---|---|---|---|
| Low-lint cloth | Dry dust removal on smooth surface finish | Very low residue risk | Best for initial dry wipe before wet cleaning |
| Soft sponge | Light grime on tile or sealed paint | May retain moisture if overused | Use lightly to avoid oversaturation |
| Adhesive prep wipes | Pre-mount cleaning for adhesive contact | Possible chemical residue depending on surface | Check compatibility with surface finish |
| Isopropyl alcohol | Oil removal and fast drying preparation | May affect coatings if overapplied | Use sparingly and allow full evaporation |
| Mild cleaner | General household contamination removal | May leave film depending on formulation | Follow with clean water wipe if needed |
| Clean water | Light residue removal and rinse step | Low residue risk | Useful as final surface rinse |
| Drying cloth | Moisture removal after cleaning | No direct residue, but may trap moisture if reused wet | Use dry and clean for final wipe |
Note: adhesive prep wipes differ from medical skin barrier wipes, which are designed for skin use and are not the same as wall-surface preparation materials.
Low-lint wall cloths and soft sponges
Low-lint wall cloths and soft sponges are suitable for light wall cleaning where dust removal, lint control, and surface gentleness are required. A low-lint cloth lifts dust while avoiding fiber transfer, and a soft sponge supports mild wiping on delicate finish areas without heavy abrasion. Damp-not-wet use helps control moisture so the surface does not become overly exposed, especially on painted or coated walls where sensitivity varies.
Low-lint wall cloths and soft sponges work safely when selection is based on lint behavior, abrasion level, and surface finish sensitivity. The points below explain how each tool behaves under different wall conditions.
- Low-lint cloth: lifts dust while minimizing lint transfer on wall surface and protecting delicate finish layers
- Wall cloth: supports dry wipe on smooth surfaces where lint control is needed
- Soft sponge: helps remove light smudges using damp-not-wet wiping with limited abrasion
- Coarse texture caution: reduces effectiveness of both cloth and sponge due to uneven contact
- Drying cloth: controls remaining moisture and helps stabilize surface condition after damp-not-wet wiping
Adhesive prep wipes, alcohol solutions, and mild cleaners
Adhesive prep wipes, isopropyl alcohol, alcohol solution, and mild cleaners can be used as surface cleaners only when they are surface-safe and do not leave cleaner residue that affects adhesion. Their effectiveness depends on how the wall surface reacts to coating sensitivity, moisture exposure, and finish type, so a test spot is typically required before wider use.
Wall-surface cleaning with adhesive prep wipes is not the same as medical skin protection or skin-barrier wipes, which are designed for direct skin use and not for painted or coated surfaces. In surface preparation, these materials must be treated strictly as cleaning tools with controlled use, not as adhesion promoters or guaranteed bonding aids.
On painted surface or coated wall surface, these cleaners may behave differently depending on finish sensitivity and absorption level, so drying time and cleaner residue behavior become important before mounting.
- Adhesive prep wipes: use on wall surface only when surface-safe; may leave cleaner residue depending on coating
- Isopropyl alcohol / alcohol solution: effective for light oil removal; requires test spot on painted surface to check finish reaction
- Mild cleaners: support general cleaning but may require rinsing and full drying to avoid slippery residue
- Test spot: required on hidden area to confirm surface-safe behavior before full application
- Drying time: essential after cleaning to ensure no moisture or residue remains before mounting contact
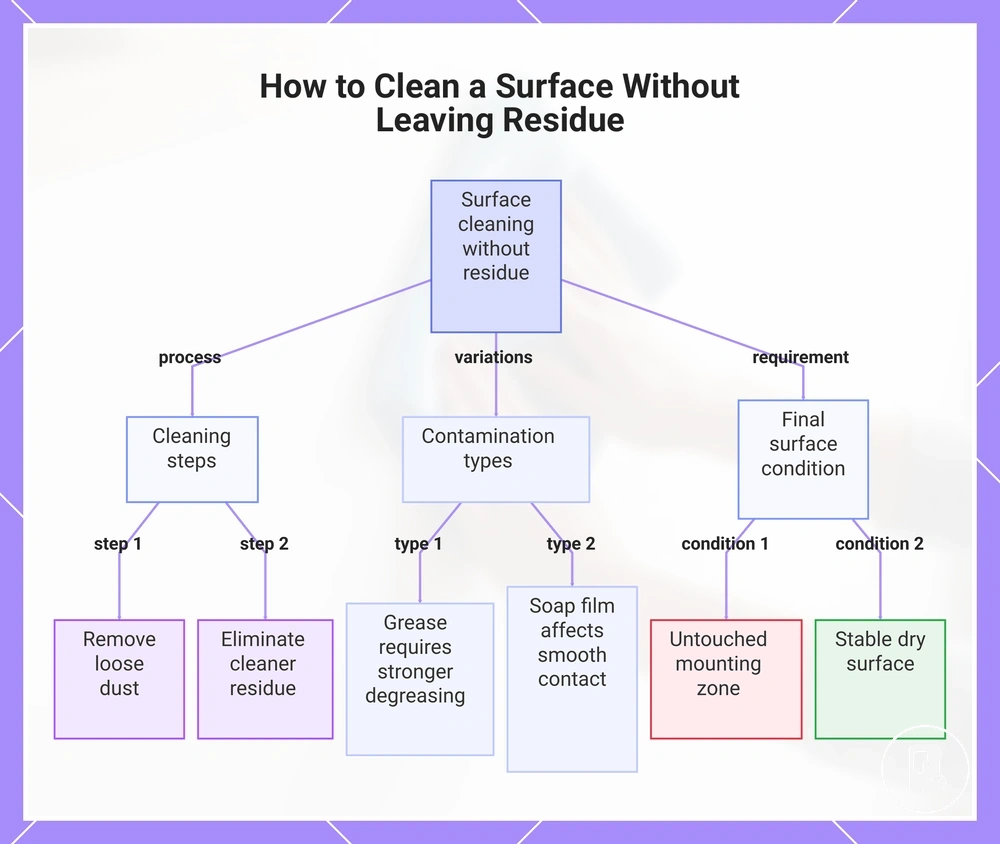
Clean the surface without leaving residue
Clean the surface without leaving residue is a surface-preparation process that removes contamination while ensuring the mounting zone does not retain cleaner residue that can interfere with adhesive contact. It focuses on moving from loose dirt removal to controlled wiping and drying so the surface reaches a stable dry surface condition. The process stays strictly within preparation and does not involve installation or load application.
Clean the surface without leaving residue starts with removing loose contamination and continues step by step toward residue control and final drying. The ordered sequence below guides the clean surface process from initial dust removal to a ready mounting zone without leaving surface film.
- Loose dust removal using a clean cloth to clean the surface and lift loose dust from the mounting zone
- Gentle wiping of the wall surface to ensure controlled gentle wiping without spreading contamination
- Targeted degreasing where needed using mild cleaner or alcohol solution depending on surface-safe conditions
- Cleaner residue removal to eliminate any cleaner residue that may affect adhesive contact
- Second clean wipe to refine the surface and confirm a residue-free area
- Dry surface phase where the mounting zone is left untouched surface and allowed to fully dry
Kitchen grease, bathroom soap film, and old adhesive marks require careful variation within the same cleaning sequence. Kitchen grease may require stronger degreasing steps, while bathroom soap film can affect smooth contact on damp areas. Old adhesive marks should be handled carefully because aggressive removal can affect painted surface integrity and increase risk to the coating.
After cleaning, the mounting zone must remain untouched to preserve adhesive contact quality. Any additional wiping or touching can reintroduce cleaner residue or dust and reduce surface readiness. The goal is to maintain a stable dry surface until the next application step begins.
This chart shows the step-by-step process for cleaning a surface without leaving residue, including variations for different contaminants and the final surface condition required for adhesive contact.
Remove dust, grease, soap film, and old adhesive marks
Dust, grease, soap film, old adhesive marks, finger oils, and cleaning spray film are the most common residues that must be removed before adhesive pad or suction contact. Each residue creates a different level of contact risk by interfering with adhesive pad bonding or suction seal stability on the wall surface.
Different residues behave in different ways on the mounting zone, which is why identifying their source helps prevent weak contact conditions. The table below connects each residue type to its origin and its effect on adhesive or suction performance.
| Residue | Common source | Effect on contact or seal | Safer cleaning response |
|---|---|---|---|
| Dust | Airborne particles and dry surfaces | Weak adhesive pad contact due to loose surface layer | Dry cloth removal and light gentle wipe |
| Grease | Kitchen cooking areas | Oily film reduces adhesion strength and grip | Mild cleaner degreasing where surface-safe |
| Soap film | Bathroom wall moisture and cleaning residue | Reduces suction seal stability and increases slip risk | Rinse and controlled wiping |
| Old adhesive marks | Previous pads or strips | Uneven surface area and potential paint risk during removal | Surface-safe removal with caution |
| Finger oils | Direct hand contact | Reduces adhesive pad bonding efficiency | Alcohol solution light wipe |
| Cleaning spray film | Spray cleaners on wall surface | Leaves surface film that disrupts adhesion and contact | Wipe clean and follow with second clean wipe |
These residues should be fully removed to maintain a stable dry surface and reliable adhesive or suction contact conditions.
Rinse or wipe away cleaner residue before mounting
Cleaner residue can leave a residue layer that turns into streaks or a tacky film on the mounting surface if it is not removed before drying. This cleaner residue can interfere with adhesive contact and suction seal behavior, making the mounting surface less stable. The final wipe ensures cleaner residue is removed so the mounting surface can transition into a clean, dry-ready condition.
Rinse or wipe away cleaner residue before mounting using a final pass that removes film and prepares the mounting surface for no-touch drying.
- Use clean water for a rinse wipe to reduce cleaner residue on the mounting surface
- Apply a clean cloth to perform a final wipe and remove visible streaks
- Check for tacky film or slick surface feel as signs of remaining cleaner residue
- Allow no-touch drying so the prepared area stabilizes without new contamination
A slick surface, damp feel, or visible streaks indicate the mounting surface is not ready because cleaner residue may still be present. A properly prepared surface should feel dry, clean, and free from tacky film before any adhesive contact or suction seal is applied.
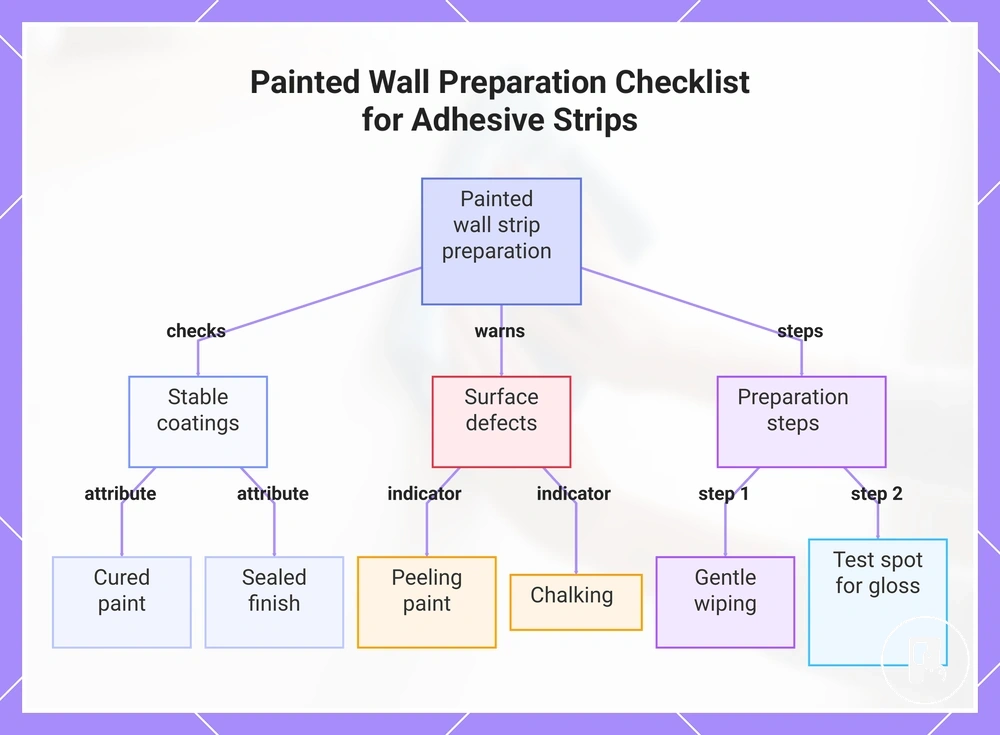
Prepare painted walls for surface-safe adhesive strips
Painted walls depend on paint condition because cured paint, sealed finish quality, and surface stability directly affect how surface-safe adhesive strips and paint-safe adhesive strips bond and whether lifting or damage risk increases. Painted wall preparation must stay gentle since peeling paint, chalking, or weak coatings can reduce adhesion even when the surface looks clean, so evaluation of paint condition is required before application and gentle wiping is applied where needed, with qualification based on paint-safe behavior.
Cured paint generally supports safer use of surface-safe adhesive strips, while uncured paint or soft coatings may shift under pressure and reduce bond stability. Peeling paint increases lifting risk because loose layers cannot hold adhesion, and chalking creates a powdery barrier that weakens contact performance over time. Gloss level also matters since higher gloss surfaces may change residue behavior and may require a test spot along with gentle wiping to confirm paint-safe response on the coated wall surface.
Prepare painted walls for surface-safe adhesive strips by verifying paint condition and cleaning behavior before application.
Use the checklist below to evaluate whether the painted wall is suitable for surface-safe adhesive strips and paint-safe adhesive strips, ensuring paint condition and cleaning safety are properly assessed.
- Cured paint: stable coating that supports safer adhesive contact
- Sealed finish: reduces loose surface particles and improves bonding consistency
- Peeling paint: indicates lifting risk and weak surface integrity
- Chalking: powdery residue that can weaken adhesive grip
- Gloss level: may influence residue visibility and test spot behavior
- Gentle wiping: light cleaning method used to remove dust without damaging paint layer
- Test spot: confirms paint-safe response before full application
Surface-safe adhesive strips and paint-safe adhesive strips still depend on paint condition, and fragile or uncured paint can fail even when the wall appears visually clean, so compatibility remains conditional rather than guaranteed.
This chart shows the key factors and steps for evaluating paint condition and preparing painted walls before applying surface-safe adhesive strips.
Prepare tile, glass, and glossy surfaces for suction or adhesive mounting
Tile, glass, and glossy surfaces require clean, uninterrupted contact for suction seal and adhesive contact because smoothness, residue presence, and edge interruptions directly influence mounting stability. A tile, glass surface, or glossy surface can support a smooth contact area only when soap film, hard-water marks, and moisture are controlled, while grout lines or textured interruptions can reduce reliability, so performance remains conditional based on surface condition.
Prepare tile, glass, and glossy surfaces for suction or adhesive mounting by comparing how smoothness, residue, moisture, and edge interruptions affect contact performance across different surface types.
Glossy surfaces differ mainly by smoothness level, porosity behavior, and edge interruptions that affect how a suction seal or adhesive contact forms. These differences determine whether a contact patch remains stable or breaks under moisture or residue influence.
Surface condition comparison for tile, glass, and glossy surfaces:
| Surface condition | Preparation focus | Mounting risk to watch |
|---|---|---|
| Smooth tile | Remove soap film and maintain dry smooth contact area | Grout lines interrupting suction seal formation |
| Glass surface | Ensure streak-free cleaning and remove residue layers | Hard-water marks reducing adhesive contact stability |
| Glossy laminate | Check uniform surface and eliminate cleaning film | Residue layers affecting contact patch consistency |
| Textured tile | Assess surface irregularity before suction or adhesive use | Edge interruption preventing stable contact formation |
| Shower tile | Control moisture, soap film, and surface wetness | Moisture and grout lines weakening suction seal reliability |
In shower tile conditions, water exposure, soap residue, and grout interruptions often change suction reliability even when the surface appears visually clean, so preparation must focus on maintaining a smooth contact area rather than assuming visual cleanliness is sufficient.
Smooth tile and glass surfaces
Smooth tile and glass surfaces are favorable for suction seal and adhesive contact when they provide a continuous contact area that is clean, dry, and uninterrupted. Smooth tile and glass surfaces support stable mounting because a continuous contact area allows consistent bonding, but performance can still vary when coatings, texture differences, or moisture exposure are present, so results remain conditional.
Smooth tile and glass surfaces require local preparation checks because maintaining a continuous contact area depends on controlling residue, dryness, and edge placement.
- Remove soap film to preserve a clean continuous contact area for suction seal and adhesive contact
- Clean hard-water spots to reduce mineral buildup on smooth tile or glass surface
- Apply alcohol-safe final wipe where suitable to refine the surface before mounting
- Ensure dry surface conditions to support stable adhesion and suction performance
- Maintain edge distance by avoiding placement too close to edges where seal stability can weaken
Textured tile, grout lines, and uneven edges
Textured tile, grout lines, and uneven edges can interrupt suction seal and reduce adhesive contact even after cleaning because the surface cannot maintain a fully continuous contact area. These interruptions create instability at the contact point, so mounting reliability depends more on surface shape than cleanliness in many cases.
Textured tile, grout lines, and uneven edges should be diagnosed by identifying where the contact breaks occur, since the issue is usually structural rather than surface dirt.
Textured tile, grout lines, and uneven edges diagnose contact interruptions that affect suction seal and adhesive contact performance even after cleaning the surface.
- Grout lines: create air gaps that interrupt suction seal and reduce continuous contact area stability
- Raised texture: reduces adhesive contact by limiting full surface contact and creating uneven pressure points
- Bevels: disrupt edge alignment and weaken the contact patch, increasing instability risk
- Cracks: break surface continuity and can raise release risk for both suction seal and adhesive contact
- Porous tile: can absorb moisture or cleaner residue, affecting bonding consistency and reliability
- Uneven edges: reduce usable contact patch size and make stable mounting less predictable
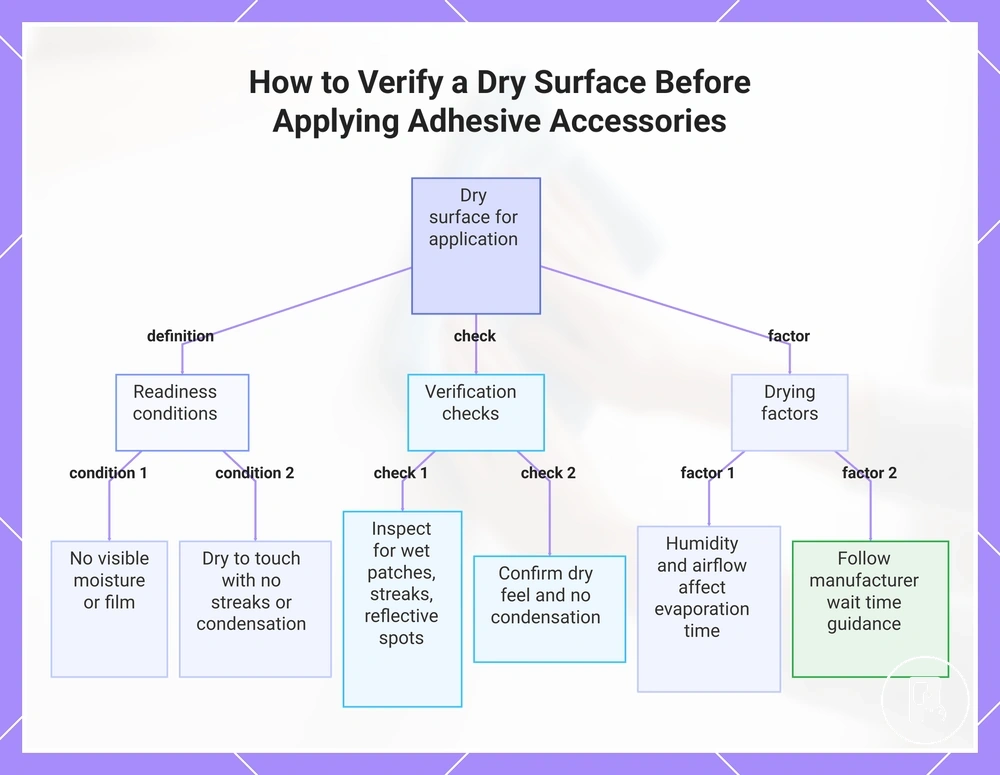
Let the surface dry before applying pads, strips, or suction cups
The dry surface is ready for pads, strips, or suction cups when all visible moisture, water traces, and cleaner film have evaporated. A proper application-ready surface should feel dry to the touch and show no streaks or condensation, because remaining moisture can weaken adhesion or suction contact. Readiness remains conditional based on bathroom humidity, surface type, and prior cleaning method.
Let the surface dry fully so it reaches a stable condition free from visible moisture and surface film before any application begins.
Drying may take longer in humid bathrooms or after alcohol and water-based cleaning, since evaporation speed depends on airflow and room conditions. Always follow manufacturer instructions when available, as they may define specific wait time guidance based on material behavior. Once the surface is fully dry, the process transitions from preparation to installation via install no-drill accessories.
Let the surface dry before applying pads, strips, or suction cups and verify readiness using the checklist below before moving forward with application.
- Visible dryness: no wet patches, streaks, or reflective moisture spots
- Touch-dry feel: surface feels dry without dampness or slick residue
- No streaks: cleaning marks or liquid trails are no longer visible
- No condensation: especially important in bathroom humidity conditions
- Evaporation complete: alcohol or water-based cleaners have fully dried
- Manufacturer instructions: follow product-specific wait time guidance when provided
This chart shows the required surface dryness conditions, verification checks, and key factors for proper adhesive or suction cup application.
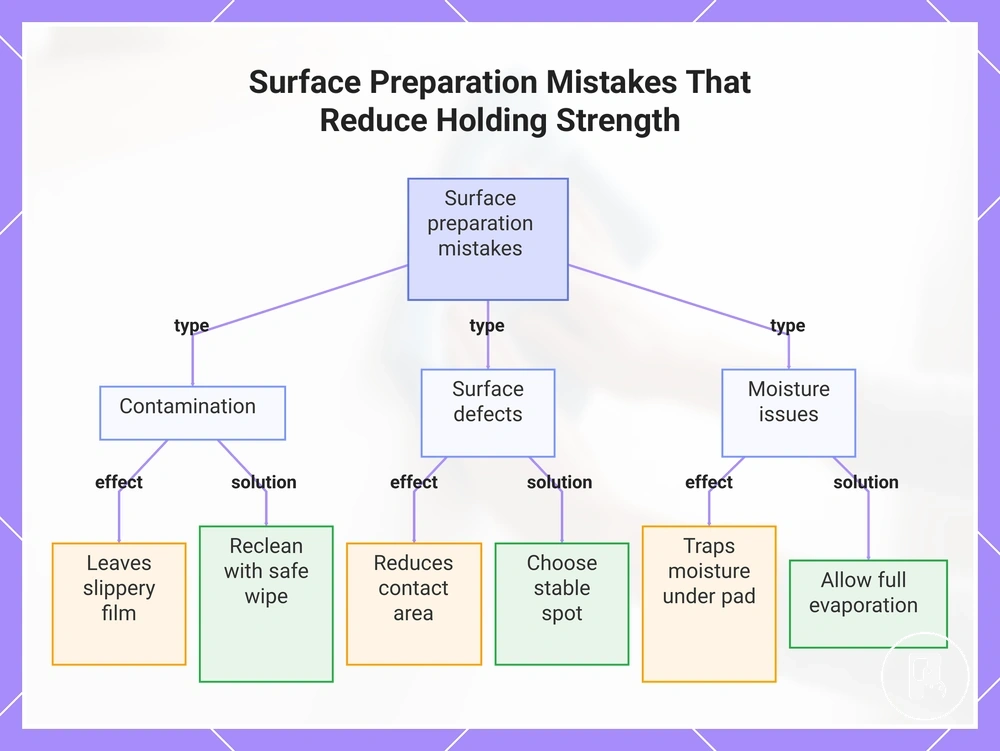
Surface preparation mistakes that reduce holding strength
Surface preparation mistakes that reduce holding strength occur when small cleaning or readiness errors prevent pads, strips, or suction cups from forming stable contact with the surface. These mistakes often weaken adhesion before the accessory is even loaded, so early prevention is more important than correction after installation. Most issues come from overlooked surface conditions rather than the mounting system itself. :contentReference[oaicite:0]{index=0}
Surface preparation mistakes that reduce holding strength usually happen during final cleaning or drying stages, where minor oversights create weak contact zones. The list below connects each preparation error with its direct effect on adhesion performance and safer response steps.
- Residue-heavy cleaners → leave a slippery film that weakens adhesive contact → re-clean the surface with a safer wipe
- Damp surface → prevents stable bonding and increases suction seal instability → allow full evaporation before application
- Touching the cleaned area → transfers finger oils that reduce contact quality → avoid contact and re-clean if touched
- Peeling paint → creates loose coating that reduces holding strength → choose another spot with stable surface
- Grout lines → interrupt contact area and create air gaps → reposition to a flatter surface zone
- Soap film → forms hidden barrier that weakens adhesion and suction grip → re-clean until fully removed
- Rushed dry time → traps moisture under pads or strips causing release risk → wait longer before application
When these signals appear, the surface should be stopped, re-cleaned, or repositioned rather than forcing application. Choosing another spot is often more reliable when grout interruptions or peeling paint cannot be avoided. If instability continues after correction, prevent accessories from falling to understand broader failure conditions beyond preparation mistakes.
This chart shows common surface preparation mistakes, their direct effects on adhesion, and corrective steps to prevent failure.